The Agent-to-Agent (A2A) protocol has opened up incredible possibilities for AI agent communication and collaboration across different platforms. However, there’s been a significant limitation that has puzzled many developers: why can’t we run multiple A2A agents on the same server?
Until now, deploying multiple A2A agents meant spinning up separate servers or using different ports for each agent, creating unnecessary complexity and resource overhead. But what if I told you there’s an elegant solution that changes everything?
The Problem: One Server, One Agent Limitation
Traditionally, A2A implementations have been constrained by a “one agent per server” model. This limitation stems from how agents are typically served and discovered within the A2A ecosystem. Developers who wanted to deploy multiple specialized agents had to:
Set up multiple servers – increasing infrastructure costs
Use different ports – complicating network configuration
Manage separate deployments – multiplying maintenance overhead
The Solution: Path-Based Agent Routing
The breakthrough comes from a surprisingly simple yet powerful concept: serving multiple agents through unique URL paths on a single server. Instead of dedicating entire servers to individual agents, we can host them all under different paths.
Here’s how it works in practice:
Multiple Agents, One Host
Imagine running three different agents on the same server:
Each agent maintains its own unique identity and capabilities while sharing the same underlying infrastructure.
Technical Innovation: The Architecture Behind It
The solution leverages FastAPI’s powerful routing capabilities combined with the A2A SDK to create a multi-tenant agent hosting platform. Here’s what makes it work:
Smart URL Routing
Each agent is mapped to a specific URL path pattern (/a2a/{agent_name}/), allowing the server to route requests to the appropriate agent handler while maintaining A2A protocol compliance.
Context Isolation
Despite sharing the same server, each agent maintains its own context and conversation state, ensuring no cross-contamination between different agent interactions.
Resource Optimization
By sharing the same Python process and server resources, this approach significantly reduces memory footprint and startup time compared to running separate server instances.
Real-World Benefits
1. Cost Efficiency
Reduced Infrastructure: One server handles multiple agents
Lower Resource Usage: Shared memory and CPU resources
Simplified Deployment: Single deployment pipeline
2. Operational Simplicity
Unified Monitoring: All agents under one roof
Centralized Logging: Easier debugging and maintenance
Single Configuration: One environment setup for all agents
3. Scalability
Horizontal Scaling: Add more agents without new servers
Load Balancing: Distribute traffic across agent types
Flexible Resource Allocation: Adjust resources based on actual usage
Getting Started: Your First Multi-Agent Server
Setting up your own multi-agent A2A server is surprisingly straightforward:
Creating Three Agents with the [google-adk](https://google.github.io/adk-docs/) Library
Conversation Agent
from google.adk.agents import LlmAgent
from google.adk.tools import google_search

from a2a.types import AgentCapabilities, AgentCard, AgentSkill, TransportProtocol

CONVERSATION_AGENT_INSTRUCTIONS = """
You are a Conversation Agent Enhanced with Web Search Capabilities.

## Core Behavior:
- Be conversational, friendly, and helpful
- Provide accurate, relevant, and well-structured responses
- Maintain context throughout the conversation
- Ask clarifying questions when user intent is unclear
- Admit when you don't know something and offer to search

## When to Use Web Search:
1. Current events or time-sensitive info
2. Precise, up-to-date facts
3. Latest technical details
4. Local information
5. Verification of uncertain info
6. Specialized topics needing expert sources

## Search Strategy:
- Use specific queries and authoritative sources
- Cross-reference results
- Distinguish between your knowledge and searched info
- Attribute sources when relevant

## Response Guidelines:
1. Direct answers first
2. Break down complex topics
3. Provide examples
4. Offer multiple perspectives
5. Suggest follow-ups

## Information Quality:
- Prioritize accuracy
- State confidence levels
- Warn about outdated info
- Suggest multiple sources for key decisions
- Fact-check critical points

## Conversation Management:
- Retain and build upon previous context
- Transition topics smoothly
- Match tone to user style
- Respect preferences

## Limitations and Transparency:
- Be honest about capabilities
- Explain when search might help
- Acknowledge incomplete info
- Suggest alternative resources
- Respect privacy

## Best Practices:
- Stay respectful and professional
- Avoid bias
- Use proactive search
- Structure answers clearly
- End with an offer to assist further
"""


def get_conversational_agent(model: str) -> LlmAgent:
    return LlmAgent(
        model=model,
        name="conversational_agent",
        description="An AI assistant that enhances conversations with live web search when needed.",
        instruction=CONVERSATION_AGENT_INSTRUCTIONS,
        tools=[google_search],
    )


def get_conversational_agent_card(agent_url: str) -> AgentCard:
    return AgentCard(
        name="Conversational Agent",
        description="Smart Conversational Agent Enhanced with Web Search Capabilities",
        url=agent_url,
        version="1.0",
        capabilities=AgentCapabilities(streaming=True),
        default_input_modes=["text/plain"],
        default_output_modes=["text/plain"],
        preferred_transport=TransportProtocol.jsonrpc,
        skills=[
            AgentSkill(
                id="conversational_agent",
                name="Conversational Agent",
                description="A Smart Conversational Agent Enhanced with Web Search Capabilities",
                tags=["SmartAssistant", "LiveSearch", "AIPowered", "Conversation"],
                examples=[
                    "Find the latest market share statistics for electric vehicles.",
                    "Why is Trump's tariff a problem for India?",
                    "What are people talking about on social media?",
                ],
            )
        ],
    )
Trending Topics Agent
from google.adk.agents import LlmAgent
from google.adk.tools import google_search

from a2a.types import AgentCapabilities, AgentCard, AgentSkill, TransportProtocol


def get_trending_topics_agent(model: str) -> LlmAgent:
    return LlmAgent(
        model=model,
        name="trending_topics_agent",
        instruction="""
    You are a social media trends analyst. Your job is to search the web for current trending topics,
    particularly from social platforms.

    When asked about trends:
    1. Search for "trending topics today" or similar queries
    2. Extract the top 3 trending topics
    3. Return them in a JSON format

    Focus on current, real-time trends from the last 24 hours.

    You MUST return your response in the following JSON format:
    {
        "trends": [
            {
                "topic": "Topic name",
                "description": "Brief description (1-2 sentences)",
                "reason": "Why it's trending"
            },
            {
                "topic": "Topic name",
                "description": "Brief description (1-2 sentences)",
                "reason": "Why it's trending"
            },
            {
                "topic": "Topic name",
                "description": "Brief description (1-2 sentences)",
                "reason": "Why it's trending"
            }
        ]
    }

    Only return the JSON object, no additional text.
    """,
        tools=[google_search],
    )


def get_trending_topics_agent_card(agent_url: str) -> AgentCard:
    return AgentCard(
        name="Trending Topics Agent",
        url=agent_url,
        description="Searches the web for current trending topics from social media",
        version="1.0",
        capabilities=AgentCapabilities(streaming=True),
        default_input_modes=["text/plain"],
        default_output_modes=["text/plain"],
        preferred_transport=TransportProtocol.jsonrpc,
        skills=[
            AgentSkill(
                id="find_trends",
                name="Find Trending Topics",
                description="Searches for current trending topics on social media",
                tags=["trends", "social media", "twitter", "current events"],
                examples=[
                    "What's trending today?",
                    "Show me current Twitter trends",
                    "What are people talking about on social media?",
                ],
            )
        ],
    )
Trend Analyzer agent
from google.adk.agents import LlmAgent
from google.adk.tools import google_search

from a2a.types import AgentCapabilities, AgentCard, AgentSkill, TransportProtocol


def get_analyzer_agent(model: str) -> LlmAgent:
    return LlmAgent(
        model=model,
        name="trend_analyzer_agent",
        instruction="""
        You are a data analyst specializing in trend analysis. When given a trending topic,
        perform deep research to find quantitative data and insights.

        For each trend you analyze:
        1. Search for statistics, numbers, and metrics related to the trend
        2. Look for:
           - Engagement metrics (views, shares, mentions)
           - Growth rates and timeline
           - Geographic distribution
           - Related hashtags or keywords
        3. Provide concrete numbers and data points

        Keep it somehow concise

        Always prioritize quantitative information over qualitative descriptions.
        """,
        tools=[google_search],
    )


def get_analyzer_agent_card(agent_url: str) -> AgentCard:
    return AgentCard(
        name="Trend Analyzer Agent",
        url=agent_url,
        description="Performs deep analysis of trends with quantitative data",
        version="1.0",
        capabilities=AgentCapabilities(streaming=True),
        default_input_modes=["text/plain"],
        default_output_modes=["text/plain"],
        preferred_transport=TransportProtocol.jsonrpc,
        skills=[
            AgentSkill(
                id="analyze_trend",
                name="Analyze Trend",
                description="Provides quantitative analysis of a specific trend",
                tags=["analysis", "data", "metrics", "statistics"],
                examples=[
                    "Analyze the #ClimateChange trend",
                    "Get metrics for the Taylor Swift trend",
                    "Provide data analysis for AI adoption trend",
                ],
            )
        ],
    )
Smart Router Integration
By implementing the abstract class JSONRPCApplication with sophisticated FastAPI routing, this solution doesn’t just solve the “one agent per server” limitation—it creates a robust, scalable architecture for enterprise A2A deployments.
The solution uses FastAPI’s APIRouter to create isolated routing contexts for each agent:
At the core of this solution is a sophisticated request handler factory that creates isolated execution environments for each agent:
from a2a.server.request_handlers import DefaultRequestHandler
from a2a.server.tasks import InMemoryTaskStore
from google.adk import Runner
from google.adk.a2a.executor.a2a_agent_executor import A2aAgentExecutor, A2aAgentExecutorConfig
from google.adk.agents import LlmAgent
from google.adk.artifacts import InMemoryArtifactService
from google.adk.memory import InMemoryMemoryService
from google.adk.sessions import InMemorySessionService


class A2ARequestHandler:
    @staticmethod
    def get_request_handler(agent: LlmAgent):
        runner = Runner(
            app_name=agent.name,
            agent=agent,
            artifact_service=InMemoryArtifactService(),
            session_service=InMemorySessionService(),
            memory_service=InMemoryMemoryService(),
        )
        config = A2aAgentExecutorConfig()
        executor = A2aAgentExecutor(runner=runner, config=config)
        return DefaultRequestHandler(agent_executor=executor, task_store=InMemoryTaskStore())
Integrating the Agent with A2A Server: A Utility Class
from typing import Callable

from a2a.types import AgentCard
from fastapi import FastAPI
from google.adk.agents import LlmAgent

from src.a2a.a2a_fastapi_app import A2AFastApiApp
from src.a2a.a2a_request_handler import A2ARequestHandler

class A2AUtils:
    """Utility class for A2A (Agent-to-Agent) communication."""
    @staticmethod
    def build(
            name: str,
            get_agent: Callable[[str], LlmAgent],
            get_agent_card: Callable[[str], AgentCard],
            model_name: str,
            agent_base_url: str,
            app: FastAPI,
    ) -> None:
        agent = get_agent(model_name)
        agent_request_handler = A2ARequestHandler.get_request_handler(agent)
        agent_card = get_agent_card(f"{agent_base_url}/{name}/")
        agent_server = A2AFastApiApp(fastapi_app=app, agent_card=agent_card, http_handler=agent_request_handler)
        agent_server.build(rpc_url=f"/{name}/", agent_card_url=f"/{name}/{{path:path}}")
Integrating the Agent with the A2A Server and Initiating the Server:
import logging
import os

import uvicorn
from dotenv import load_dotenv
from fastapi import FastAPI

from src.a2a.a2a_utils import A2AUtils
from src.agent.analyzer_agent import get_analyzer_agent, get_analyzer_agent_card
from src.agent.conversation_agent import get_conversational_agent, get_conversational_agent_card
from src.agent.trending_topics_agent import get_trending_topics_agent, get_trending_topics_agent_card

load_dotenv()

logging.basicConfig(level=logging.INFO)
logger = logging.getLogger()

AGENT_BASE_URL = os.getenv("AGENT_BASE_URL")

if not AGENT_BASE_URL:
    raise ValueError("AGENT_BASE_URL environment variable must be set")

MODEL_NAME = os.getenv("MODEL_NAME")

if not MODEL_NAME:
    raise ValueError("MODEL_NAME environment variable must be set")
logger.info(f"AGENT BASE URL {AGENT_BASE_URL}")

app: FastAPI = FastAPI(
    title="Run multiple agents on single host using A2A protocol.",
    description="Run multiple agents on single host using A2A protocol.",
    version="1.0.0",
    root_path="/a2a",
)


@app.get("/health")
async def health_check() -> dict[str, str]:
    return {"status": "ok"}


# conversation agent integration with A2A server
A2AUtils.build(
    name="conversation",
    get_agent=get_conversational_agent,
    get_agent_card=get_conversational_agent_card,
    model_name=MODEL_NAME,
    agent_base_url=AGENT_BASE_URL,
    app=app,
)

# trending_topics agent integration with A2A server
A2AUtils.build(
    name="trending_topics",
    get_agent=get_trending_topics_agent,
    get_agent_card=get_trending_topics_agent_card,
    model_name=MODEL_NAME,
    agent_base_url=AGENT_BASE_URL,
    app=app,
)

# analyzer agent integration with A2A server
A2AUtils.build(
    name="analyzer",
    get_agent=get_analyzer_agent,
    get_agent_card=get_analyzer_agent_card,
    model_name=MODEL_NAME,
    agent_base_url=AGENT_BASE_URL,
    app=app,
)

if __name__ == "__main__":
    uvicorn.run(app, host="0.0.0.0", port=8000)
A2A Client for Testing A2A Agent
from typing import Any
from uuid import uuid4

import httpx

from a2a.client import ClientConfig, ClientFactory
from a2a.types import AgentCard, Message, Part, Role, TextPart, TransportProtocol

AGENT_CARD_PATH = "/agent-card.json"


class A2AClient:
    def __init__(self, default_timeout: float = 240.0):
        # Cache for agent metadata
        self._agent_info_cache: dict[str, dict[str, Any] | None] = {}
        self.default_timeout = default_timeout

    async def create_task(self, agent_url: str, message: str, context_id: str) -> str:
        """Send a message following the official A2A SDK pattern."""
        # Configure httpx client with timeout
        timeout_config = httpx.Timeout(
            timeout=self.default_timeout,
            connect=10.0,
            read=self.default_timeout,
            write=10.0,
            pool=5.0,
        )

        async with httpx.AsyncClient(timeout=timeout_config) as httpx_client:
            # Check if we have cached agent card data
            if agent_url in self._agent_info_cache and self._agent_info_cache[agent_url] is not None:
                agent_card_data = self._agent_info_cache[agent_url]
            else:
                # Fetch the agent card
                agent_card_response = await httpx_client.get(f"{agent_url}{AGENT_CARD_PATH}")
                agent_card_data = self._agent_info_cache[agent_url] = agent_card_response.json()

            # Create AgentCard from data
            agent_card = AgentCard(**agent_card_data)

            # Create A2A client with the agent card
            config = ClientConfig(
                httpx_client=httpx_client,
                supported_transports=[
                    TransportProtocol.jsonrpc,
                    TransportProtocol.http_json,
                ],
                use_client_preference=True,
            )

            factory = ClientFactory(config)
            client = factory.create(agent_card)
            message_obj = Message(
                role=Role.user,
                parts=[Part(TextPart(text=message))],
                message_id=str(uuid4()),
                context_id=context_id,
            )
            responses = []
            async for response in client.send_message(message_obj):
                responses.append(response)
            # The response is a tuple - get the first element (Task object)
            if responses and isinstance(responses[0], tuple) and len(responses[0]) > 0:
                task = responses[0][0]  # First element of the tuple

                # Extract text: task.artifacts[0].parts[0].root.text
                try:
                    return task.artifacts[0].parts[0].root.text
                except (AttributeError, IndexError):
                    return str(task)

            return "No response received"
Let’s begin the discussion with the agent:
import asyncio
import uuid

from src.a2a.a2a_client import A2AClient


async def main():
    a2a_client: A2AClient = A2AClient()
    agent_host_url = "http://localhost:8000/a2a"

    context_id = str(uuid.uuid4())
    print(f"Starting conversation with context_id: {context_id}")

    # Turn 1 — Start conversation
    conversation_task = await a2a_client.create_task(
        agent_url=f"{agent_host_url}/conversation",
        message="Who is the Prime Minister of India?",
        context_id=context_id,
    )
    print(f"Turn 1 → {conversation_task} \n\n")

    # Turn 2 — Follow-up using pronoun (tests context memory)
    conversation_task = await a2a_client.create_task(
        agent_url=f"{agent_host_url}/conversation",
        message="What is his wife's name?",
        context_id=context_id,
    )
    print(f"Turn 2 → {conversation_task} \n\n")

    # Turn 3 — A context shift
    conversation_task = await a2a_client.create_task(
        agent_url=f"{agent_host_url}/conversation",
        message="List three major policies he introduced.",
        context_id=context_id,
    )
    print(f"Turn 4 → {conversation_task}")


if __name__ == "__main__":
    asyncio.run(main())
Conclusion: Scalable AI Agent Infrastructure
What started as a simple question—”Why can’t we run multiple A2A agents on one server?”—has led to a fundamental reimagining of how we architect AI agent systems. This solution represents more than just a technical workaround; it’s a paradigm shift that democratizes access to sophisticated multi-agent AI deployments.
The transformation is profound:
From resource-heavy to resource-efficient: One server now does the work of many
From complex to simple: Unified deployment replaces fragmented infrastructure
From experimental to enterprise-ready: Production-grade architecture enables real-world adoption
From isolated to collaborative: Multiple agents can work together seamlessly
The impact extends beyond cost savings. Organizations can now experiment with AI agent architectures that were previously prohibitively expensive. Startups can prototype sophisticated multi-agent systems without massive infrastructure investments. Enterprise teams can deploy specialized agents for different departments while maintaining centralized governance and monitoring.
This is just the beginning. As the A2A protocol matures and adoption grows, we’ll see the emergence of agent marketplaces, sophisticated orchestration platforms, and AI ecosystems that rival today’s microservices architectures in complexity and capability.
The barrier has been broken. The future of AI isn’t just about better models—it’s about better architecture that makes those models accessible, scalable, and collaborative. Welcome to the era of democratized multi-agent AI.
References
For deeper understanding and continued learning, explore these essential resources:
A2A Project Discussions – Community discussions on multi-agent architectures and deployment patterns.
Google ADK Resources
Google ADK Documentation – Comprehensive guide to the Agent Development Kit used in this implementation.
A2A Samples code
A2A Samples Repository – The official repository for a2a sample code. Some of the code samples are sourced from this collection.
These resources provide the theoretical foundation and practical examples that make this multi-agent architecture possible. Whether you’re looking to understand the A2A protocol deeper, explore Google ADK capabilities, or see additional implementation patterns, these references will accelerate your journey into the world of sophisticated AI agent systems.
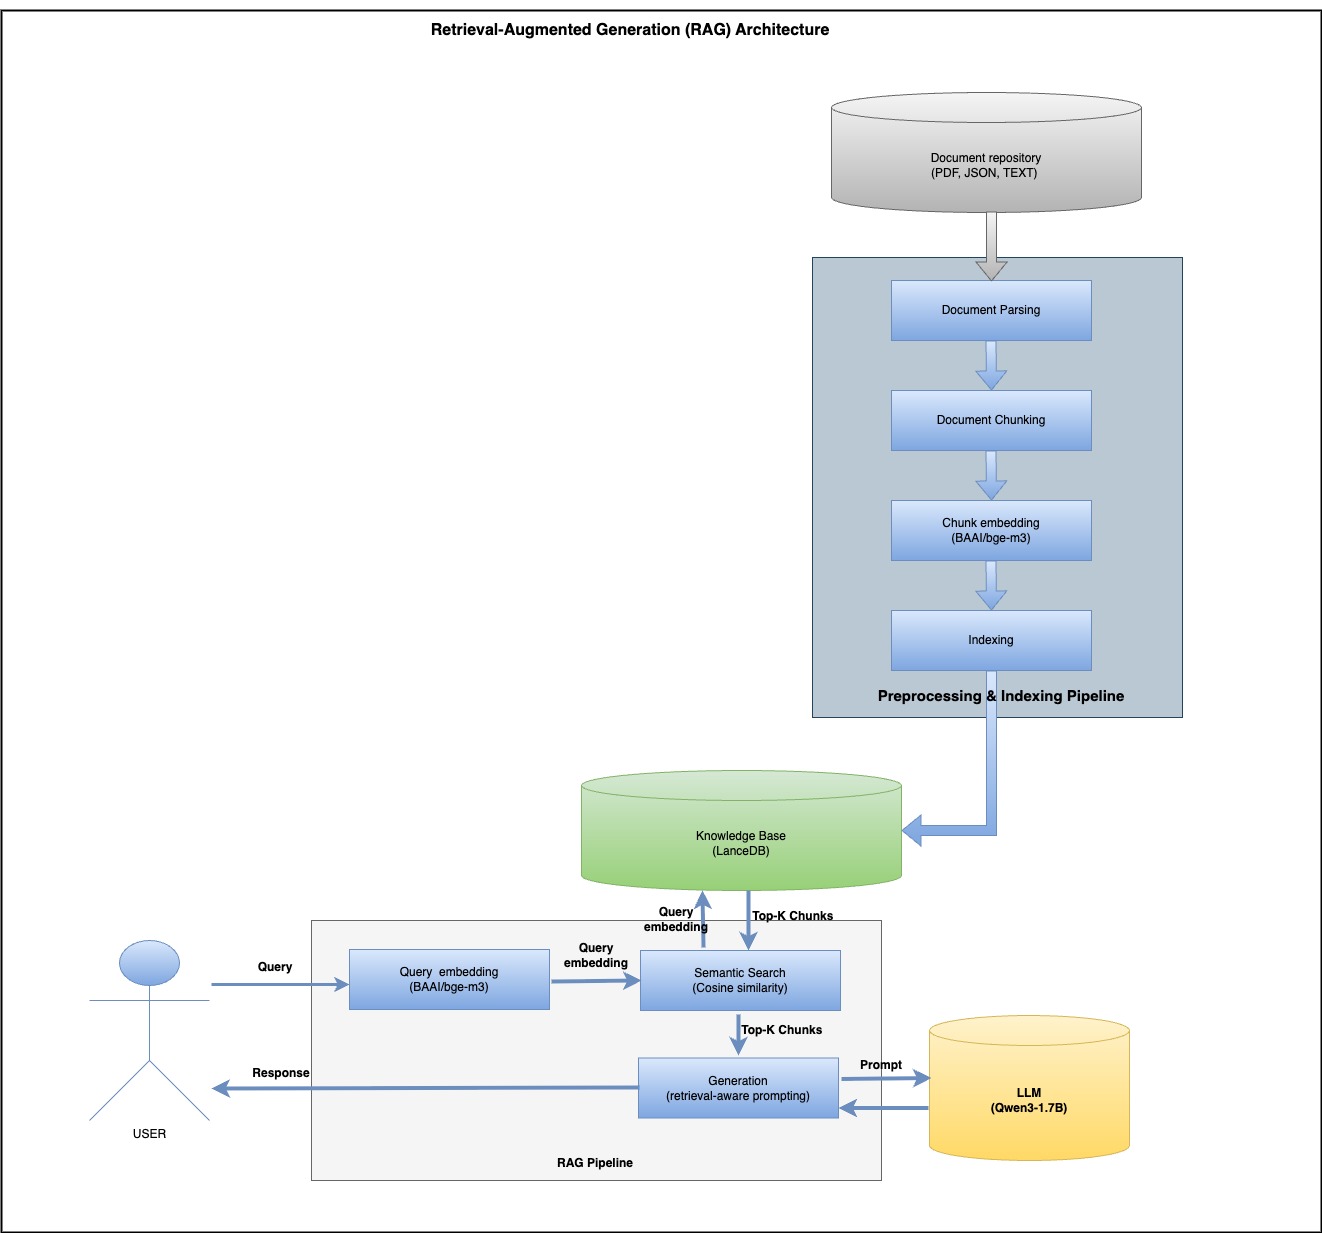
In this post, we’ll walk through a working RAG pipeline using climate science data from the IPCC to produce grounded, factual, and transparent responses with an LLM.
What Is RAG?
Retrieval-Augmented Generation (RAG) enhances LLMs by injecting context from a knowledge base during inference. Unlike traditional LLMs that may hallucinate or become outdated, RAG ensures:
Easy to update—just replace the documents, no retraining needed
Answers are grounded in your data (e.g., reports, PDFs)
Reduces hallucinations by injecting factual context
A Simple Architecture: How It Works
Step 1: Parsing & Chunking
We use docling and a hybrid tokenizer for clean document splitting:
# chunker.py
import os

from docling import chunking
from docling.document_converter import DocumentConverter
from docling_core.transforms.chunker.tokenizer.huggingface import HuggingFaceTokenizer
from transformers import AutoTokenizer


class Chunker:
    def __init__(self, embedding_model: str, max_tokens: int = 1024):
        tokenizer = HuggingFaceTokenizer(
            tokenizer=AutoTokenizer.from_pretrained(embedding_model),
            max_tokens=max_tokens,
        )
        self.__chunker = chunking.HybridChunker(tokenizer=tokenizer, merge_peers=True)

    def chunk(self, source: str):
        doc = DocumentConverter().convert(source=source).document
        chunk_iter = self.__chunker.chunk(dl_doc=doc)
        chunks = list(chunk_iter)
        chunks_dicts = []
        for chunk in chunks:
            chunks_dicts.append(
                {
                    "content": chunk.text,
                    "page_number": chunk.meta.doc_items[0].prov[0].page_no,
                    "pdf_name": os.path.basename(source),
                }
            )
        return chunks_dicts
#lancedb.py

import lancedb
from lancedb.table import Table
from pandas import DataFrame

class LanceDB:

    def __init__(self,
                 vector_storage_path: str = "./lancedb/vector_storage",
                 table_name: str = "knowledge_base"):
        db = lancedb.connect(uri=vector_storage_path)
        import pyarrow as pa
        schema = pa.schema([
            pa.field("content", pa.string()),
            pa.field("page_number", pa.int32()),
            pa.field("pdf_name", pa.string()),
            pa.field("embeddings", pa.list_(pa.float32(), 1024)),
        ])
        try:
            db.create_table(table_name, schema=schema)
            print(f"Table {table_name} created successfully.")
        except Exception as e:
            print(f"Table {table_name} already exists. {e}")
        self.__table: Table = db.open_table(name=table_name)

    def semantic_search(self, vector_query: list[float], n: int = 10, distance_threshold=0.50) -> DataFrame:
        search_results = self.__table.search(vector_query, vector_column_name="embeddings").distance_type(
            "cosine").limit(n).to_pandas()
        print(f"search_results\n\n {search_results}")
        return search_results.loc[search_results["_distance"] <= distance_threshold]

    def get_count(self) -> int:
        return self.__table.count_rows()

    def save(self, df: DataFrame):
        self.__table.add(df)
        print(f"total records in lancedb : {self.__table.count_rows()}")

    def create_index(self):
        try:
            self.__table.create_index(metric="cosine", vector_column_name="embeddings")
        except Exception as e:
            print(f"Seems index already exist {e}")
Step 4: Prompt Template
# prompt_template.py

class PromptTemplate:
    @staticmethod
    def build(context: str, question: str, max_token: int = 512) -> str:
        prompt = f"""You are a Climate Science Assistant using IPCC research to explain climate change clearly and compassionately.

**Your Approach:**
- Use solid IPCC scientific evidence
- Explain concepts accessibly for all audiences
- Be honest about uncertainties while providing clear guidance
- Support responses with specific data and findings
- Remain helpful, accurate, and encouraging
- **Keep responses under {max_token} tokens**

**Available Scientific Context (IPCC 2023 Synthesis Report):**
{context}

**Question:**
{question}

**Your Response (max {max_token} tokens):**

        """
        return prompt
# rag_main.py
import pandas as pd

from src.chunker.chunker import Chunker
from src.embedding.custom_embedding import CustomEmbeddings
from src.llm.qwen_llm import QwenLLM
from src.prompt.prompt_template import PromptTemplate
from src.storage.lancedb import LanceDB

pdf_data = "https://www.ipcc.ch/report/ar6/syr/downloads/report/IPCC_AR6_SYR_LongerReport.pdf"

EMBEDDING_MODEL = "BAAI/bge-m3"
LLM_MODEL = "Qwen/Qwen3-1.7B"


# initialize the embedding model
embeddings = CustomEmbeddings(model_name=EMBEDDING_MODEL)

# initialize the LLM
llm = QwenLLM(model_name=LLM_MODEL)

# initialize the Chunker
chunker = Chunker(embedding_model=EMBEDDING_MODEL)

# initialize the Vector DB
lancedb = LanceDB(table_name="rag_table")
# Run document Indexing
print("Start Chunking ....")
documents = chunker.chunk(pdf_data)
print("Chunking done....")
df = pd.DataFrame(documents, columns=["content", "page_number", "pdf_name"])
print("Start Embedding ....")
df["embeddings"] = df["content"].apply(embeddings.embed_query)
print("Embedding  done....")
print(df)
print("Start saving ....")
lancedb.save(df)

# RAG
query = "How is climate change affecting biodiversity?"

vector_query = embeddings.embed_query(query)
result_df = lancedb.semantic_search(vector_query=vector_query, n=2)
context = "\n\n".join(result_df["content"].tolist())
formatted_prompt = PromptTemplate.build(context=context, question=query)
print("\nFormatted Prompt:" + "\n" + formatted_prompt)
final_response = llm.invoke(formatted_prompt, enable_thinking=True, return_thinking=True)
print("\nFinal RAG Response:")
print(final_response["response"])
Final Output Example
**Question:**
How is climate change affecting biodiversity?

**Your Response (max 512 tokens):**
Final RAG Response:
Climate change is profoundly impacting biodiversity through habitat loss, shifting species ranges, and ecosystem disruptions. For example, over 50% of coastal wetlands have been lost globally due to sea level rise, warming, and extreme events, threatening species like mangroves and sea turtles. Species are shifting poleward or uphill (very high confidence), but many cannot adapt fast enough to rising temperatures or extreme weather, leading to local extinctions (very high confidence). Heat extremes and mass mortality events (e.g., coral bleaching) have caused hundreds of species losses. Irreversible changes, such as glacier retreat altering freshwater systems, are accelerating. Ocean acidification and sea level rise also disrupt marine ecosystems. While some shifts occur, many ecosystems are approaching irreversible damage, underscoring the urgency of conservation and adaptive strategies to mitigate these impacts.
Why This Matters
Trustworthy: Cites real IPCC data, not LLM guesswork
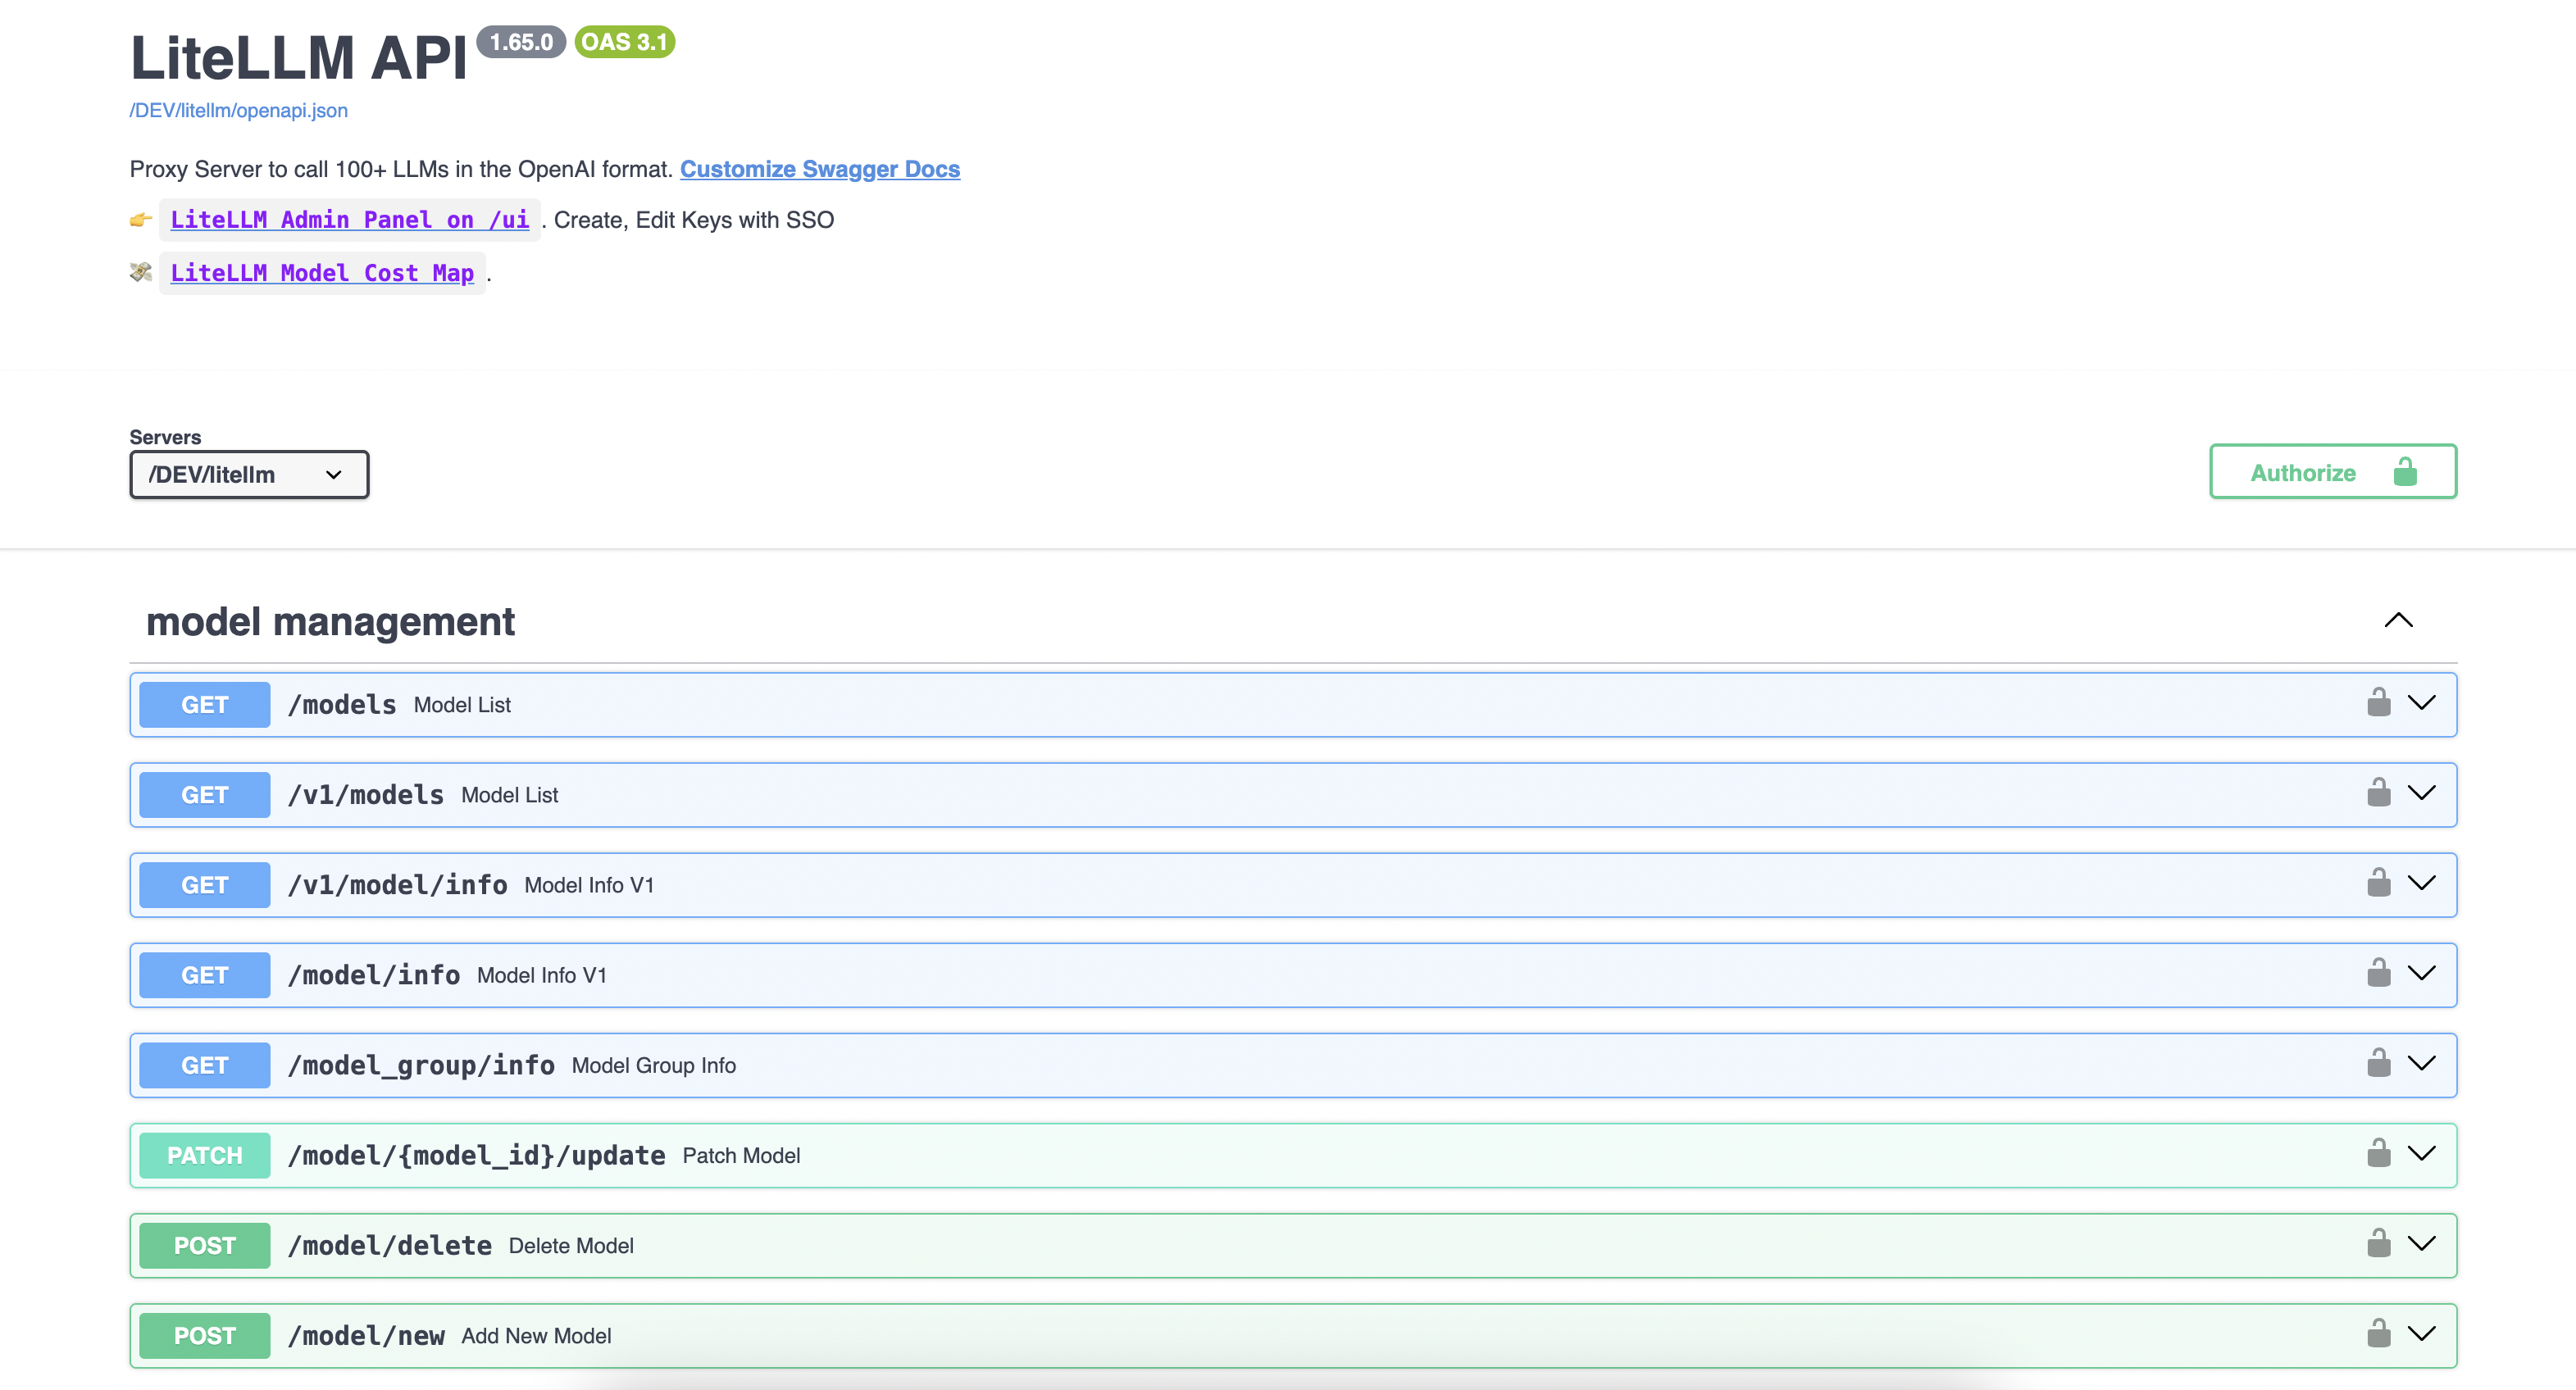
Managing multiple self-hosted LLMs can be challenging for developers. LiteLLM simplifies this by providing a single unified API endpoint for all your models, whether self-hosted or from providers like OpenAI, Gemini, and Anthropic.
We leverage open-source LLMs such as Llama 3.1 8B and Mistral 7B, along with BAAI/bge-m3 for embeddings primarily hosted on vLLM for efficient inference.
Let’s start with vLLM, vLLM is a high-throughput and memory-efficient inference and serving engine for LLMs, featuring PagedAttention for optimized attention key-value memory management.
Our LLMs run on GPU nodes for accelerated inference, while embeddings are deployed on CPU nodes.
vLLM does not provide the CPU-based docker image so I built the image from the source:
docker run -v ~/.cache/huggingface:/root/.cache/huggingface -p 8000:8000 satendra/vllm-cpu:v0.8.3 --model BAAI/bge-m3
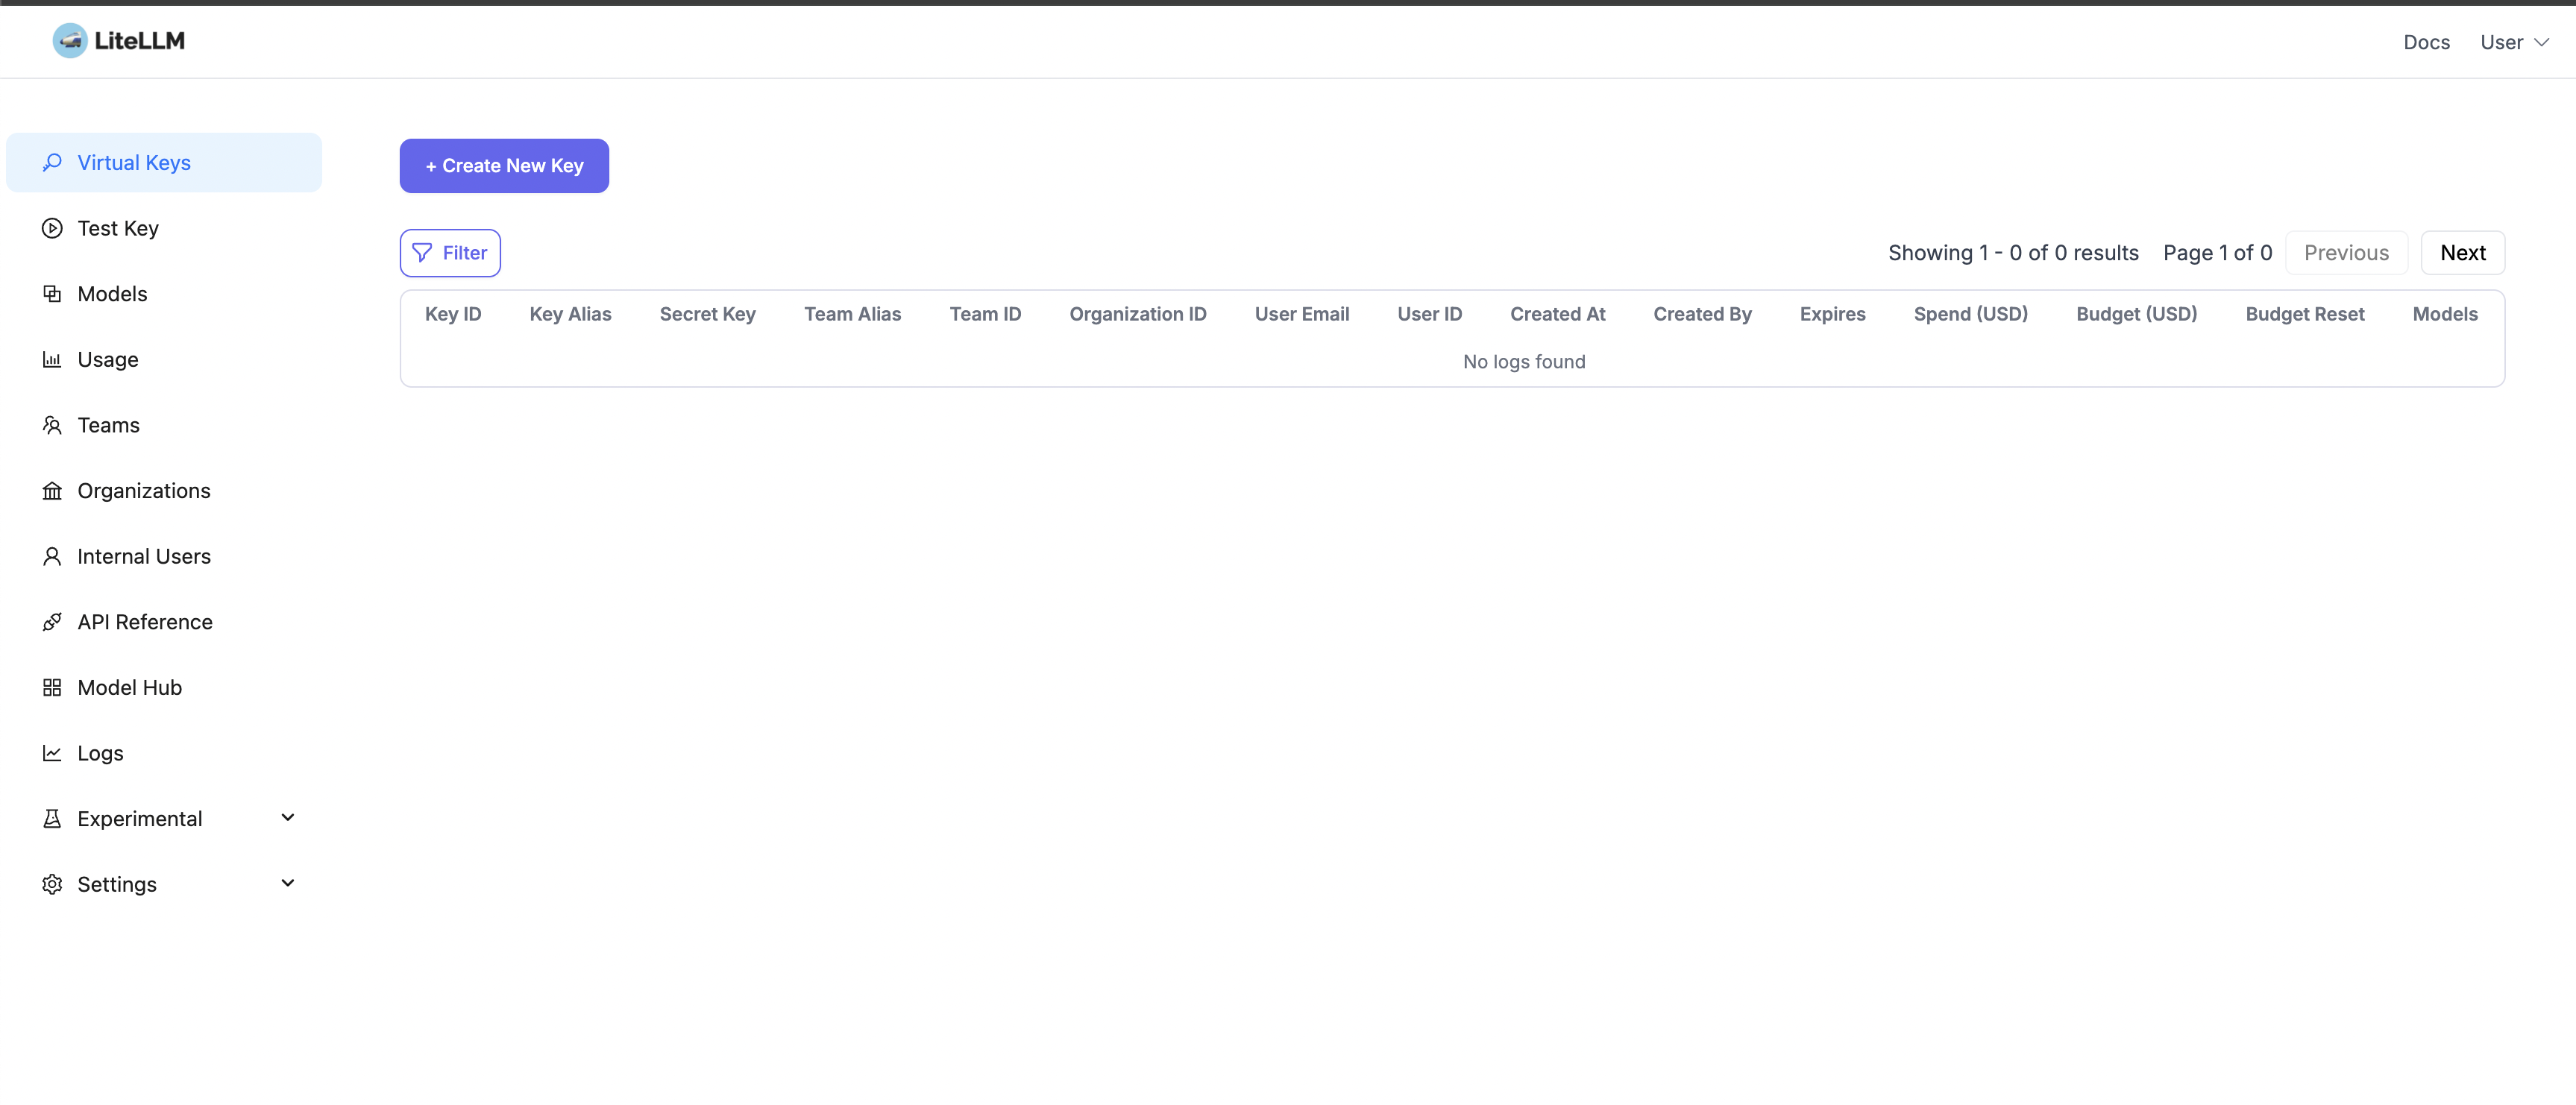
LiteLLM is a unified platform simplifying access to over 100 large language models (LLMs), providing an OpenAI-compatible API along with features such as usage tracking, fallback handling, and seamless integration for scalable inference.
To start the LiteLLM server, I am using the docker compose file:
version: "3.11"
services:
  litellm:
    build:
      context: .
      args:
        target: runtime
    image: ghcr.io/berriai/litellm:main-stable
    #########################################
    ## Uncomment these lines to start proxy with a config.yaml file ##
    volumes:
      - ./config.yaml:/app/config.yaml
    command:
      - "--config=/app/config.yaml"
     # - "--detailed_debug"
    ##############################################
    ports:
      - "4000:4000" # Map the container port to the host, change the host port if necessary
    environment:
        DATABASE_URL: "postgresql://llmproxy:dbpassword9090@db:5432/litellm"
        STORE_MODEL_IN_DB: "True" # allows adding models to proxy via UI
    env_file:
      - .env # Load local .env file
    depends_on:
      - db  # Indicates that this service depends on the 'db' service, ensuring 'db' starts first
    healthcheck:  # Defines the health check configuration for the container
      test: [ "CMD", "curl", "-f", "http://localhost:4000/health/liveliness || exit 1" ]  # Command to execute for health check
      interval: 30s  # Perform health check every 30 seconds
      timeout: 10s   # Health check command times out after 10 seconds
      retries: 3     # Retry up to 3 times if health check fails
      start_period: 40s  # Wait 40 seconds after container start before beginning health checks


  db:
    image: postgres:16
    restart: always
    environment:
      POSTGRES_DB: litellm
      POSTGRES_USER: llmproxy
      POSTGRES_PASSWORD: dbpassword9090
    ports:
      - "5432:5432"
    volumes:
      - postgres_data:/var/lib/postgresql/data  # Persists Postgres data across container restarts
    healthcheck:
      test: ["CMD-SHELL", "pg_isready -d litellm -U llmproxy"]
      interval: 1s
      timeout: 5s
      retries: 10

  prometheus:
    image: prom/prometheus
    volumes:
      - prometheus_data:/prometheus
      - ./prometheus.yml:/etc/prometheus/prometheus.yml
    ports:
      - "9090:9090"
    command:
      - '--config.file=/etc/prometheus/prometheus.yml'
      - '--storage.tsdb.path=/prometheus'
      - '--storage.tsdb.retention.time=15d'
    restart: always

volumes:
  prometheus_data:
    driver: local
  postgres_data:
    name: litellm_postgres_data  # Named volume for Postgres data persistence
Test the Mistral model with the OpenAI-compatible SDK:
from openai import OpenAI

client = OpenAI(
    base_url = "http://xx.0.139.5:4000",
    api_key='fkFihkMb8CDA02vkt7Yr',
)

response = client.chat.completions.create(
    model="Mistral-7B",
    messages = [
        {
            "role": "user",
            "content": "What are best books for Deep leaning?"
        }
    ],
    stream=False
)
print(f'LiteLLM:  response {response}')
Response from LLM:
ChatCompletion(id='chatcmpl-e708556a24e84af4af6276439209ae53', choices=[Choice(finish_reason='stop', index=0, logprobs=None, message=ChatCompletionMessage(content=" There are numerous valuable resources for deep learning, catering to different levels of expertise. Here's a brief list of some highly recommended books on the subject:\n\n1. **Deep Learning** by Yoshua Bengio, Ian Goodfellow, and Aaron Courville: This book is a comprehensive resource for deep learning and covers both theory and practice. It's widely considered one of the best books for beginners looking to learn deep learning concepts.\n\n2. **Hands-On Machine Learning with Scikit-Learn, Keras, and TensorFlow** by Aurelien Geron: This practical guide uses Python to delve into various machine learning techniques, with a significant focus on deep learning with Keras and TensorFlow.\n\n3. **Neural Networks and Deep Learning** by Michael Nielsen: This free online textbook offers an excellent introduction to the principles and techniques behind neural networks and deep learning. It is often recommended for self-study.\n\n4. **Deep Learning: A Practical Introduction** by Stephen Merity: Built around exercises, this book offers a broad and practical understanding of deep learning and associated techniques. It's a good choice for learners who prefer a hands-on approach.\n\n5. **Probabilistic Reasoning in Intelligent Systems: Networks of Plausible Inference** by Judea Pearl: Although not specifically focused on deep learning, this book provides foundational knowledge about probability theory, a crucial aspect of deep learning, and also learning doing-style content through its numerous exercises.\n\n6. **Reinforcement Learning: An Introduction** by Richard S. Sutton and Andrew G. Barto: This book provides an in-depth exploration of reinforcement learning algorithms, including those used extensively in deep learning for sequential decision making tasks.", refusal=None, role='assistant', annotations=None, audio=None, function_call=None, tool_calls=None))], created=1743945161, model='hosted_vllm/mistralai/Mistral-7B-Instruct-v0.3', object='chat.completion', service_tier=None, system_fingerprint=None, usage=CompletionUsage(completion_tokens=387, prompt_tokens=11, total_tokens=398, completion_tokens_details=None, prompt_tokens_details=None), prompt_logprobs=None)
Let’s try using a cURL request:
 curl --location 'http://xx.0.139.5:4000/chat/completions' \
     -H 'Ocp-Apim-Subscription-Key: fkFihkMb8CDA02vkt7Yr' \
  --header 'Content-Type: application/json' \
  --data ' {
  "model": "Mistral-7B",
  "messages": [
      {
      "role": "user",
      "content": "What are best books for Deep leaning?"
      }
  ]
}'
Response:
{"id":"chatcmpl-f6cc7c37dfa947e5ac2d111bb1c94783","created":1743945232,"model":"hosted_vllm/mistralai/Mistral-7B-Instruct-v0.3","object":"chat.completion","system_fingerprint":null,"choices":[{"finish_reason":"stop","index":0,"message":{"content":" Deep learning is a rapidly evolving field, and there are several excellent books that provide a solid foundation for both beginners and experts. Here are some recommendations, categorized by difficulty level:\n\n**Beginners:**\n1. \"Deep Learning with Python\" by François Chollet: This book is a comprehensive guide to deep learning with the Keras library, valuable for programmers who want to build and deploy their own models.\n2. \"Hands-On Machine Learning with Scikit-Learn, Keras, and TensorFlow\" by Aurélio Oleacretta, Georgios Yannakoudakis, and V. M. Gerosolomou: In this book, you will learn machine learning concepts along with how to implement them using popular libraries like Scikit-Learn and TensorFlow.\n3. \"Deep Learning for Beginners: A Plain English Introduction\" by M. Isaac: This book provides an accessible deep learning intro, focusing on the fundamental principles without getting lost in mathematical details.\n\n**Intermediate:**\n1. \"Neural Networks and Deep Learning\" by Michael Nielsen: This online textbook provides an in-depth exploration of neural networks and deep learning, offering clear explanations and working code examples in Python.\n2. \"Reinforcement Learning: An Introduction\" by Richard S. Sutton and Andrew G. Barto: Although not focused exclusively on deep learning, this book offers essential reinforcement learning concepts, vital for understanding many deep learning techniques.\n\n**Advanced:**\n1. \"Deep Learning\" by Yoshua Bengio, Ian Goodfellow, and Aaron Courville: This landmark book provides a detailed treatment of deep learning theory, algorithms, and applications.\n2. \"Building Machine Learning Systems\" by Carlos Guestrin: In this book, you'll learn about the key mechanisms involved in building large-scale machine learning systems, paying particular attention to challenges in handling big data.\n3. \"Adversarial Robustness: Deep Learning Under Attack\" by Marco Rocha, Raymond T.L. Chan, Cesar A. de la Salud, and Rafael H. Perera: This book focuses on adversarial attacks and defenses in deep learning, which are critical aspects of ensuring the security and robustness of deep learning systems.\n4. \"The Deep Learning Landscape\" by Iasef Badr, Tapas Kanjilal, and Enda Admiraal: This thorough overview of deep learning offers insight into various modules, techniques, and applications in the field.","role":"assistant","tool_calls":null,"function_call":null}}],"usage":{"completion_tokens":549,"prompt_tokens":11,"total_tokens":560,"completion_tokens_details":null,"prompt_tokens_details":null},"service_tier":null,"prompt_logprobs":null}
Access embeddings through the OpenAI-compatible API:
import openai
client = openai.OpenAI(api_key="fkFihkMb8CDA02vkt7Yr", base_url="http://xx.0.139.5:4000")
text = "This is an example text for embedding."
# Call the OpenAI API for embedding
response = client.embeddings.create(
    model="BAAI/bge-m3",  # Specify the embedding model
    input=text
)
embedding = response.data[0].embedding
print(embedding)
curl -X 'POST' -k 'http://xx.0.139.5:4000/embeddings' -H 'Ocp-Apim-Subscription-Key: fkFihkMb8CDA02vkt7Yr' -H 'accept: application/json' -H 'Content-Type: application/json' -d '{ "model": "BAAI/bge-m3", "input":"This is an example text for embedding."}'
Conclusion: As the landscape of LLMs continues to grow, tools like LiteLLM are essential for streamlining inference and orchestration. Its OpenAI-compatible API, built-in fallback support, and vendor flexibility position it as a robust proxy layer for modern AI applications.
Triton Server supports TensorRT Models, ONNX Models, TorchScript Models, TensorFlow Models, OpenVINO Models, Python Models, and DALI Models. I will use Python Models for Hugging Face deployment. Triton server has a standard directory structure for each model type. Here is Python model directory structure:
$ tree model_repository/ -I '__pycache__'
model_repository/    #  ROOT FOLDER(may have many models)
└── sentiment          # MODEL FOLDER NAME(same as model name)
    ├── 1                        # MODEL VERSION
    │   └── model.py   # MODEL PYTHON SCRIPT
    ├── config.pbtxt   # CONFIG FILE FOR A MODEL
    └── hf-sentiment.tar.gz # CONDA ENV(all dependencies required for hugging face)

2 directories, 3 files
Create an empty directory structure as described above and let’s understand each file one by one.
config.pbtxt It is the config for a model that describes the model name, backend, Input/Output fields and types, and model execution information like GPU or CPU, Batch size, and many more. I will take minimal configuration.
$ docker ps -a
CONTAINER ID   IMAGE                                   COMMAND                  CREATED        STATUS        PORTS                                                           NAMES
372793f53dda   nvcr.io/nvidia/tritonserver:23.06-py3   "/opt/nvidia/nvidia_…"   18 hours ago   Up 15 hours   0.0.0.0:8000-8002->8000-8002/tcp, :::8000-8002->8000-8002/tcp   nervous_shannon
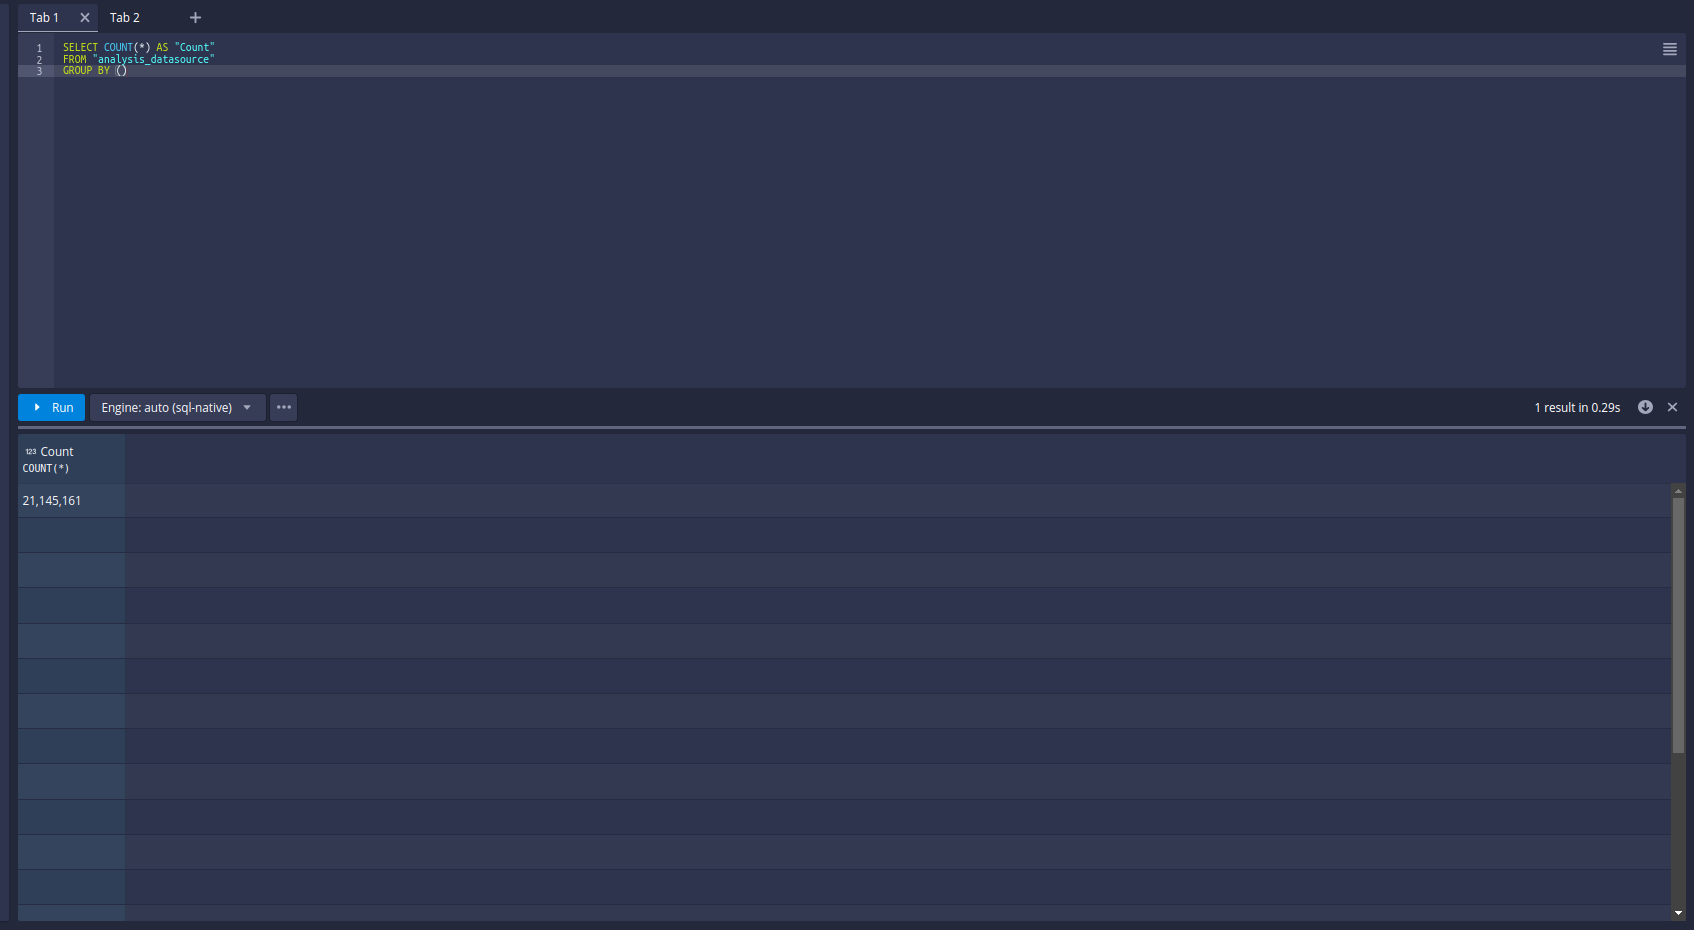
We are using Apache Spark for the data processing. Surprisingly, There is no official Spark connector for the Druid database. Druid’s primary ingestion methods are all pull-based. That means Druid reads the data from sources like S3 and Postgres and stores it in data sources, which are similar to tables in a traditional RDBMS.
For Loading data into Druid, we are writing all the data on S3 buckets in JSON format and sending API calls to the Druid indexer to load data from S3.
Druid supports JSON, CSV, Parquet, ORC, and other formats.
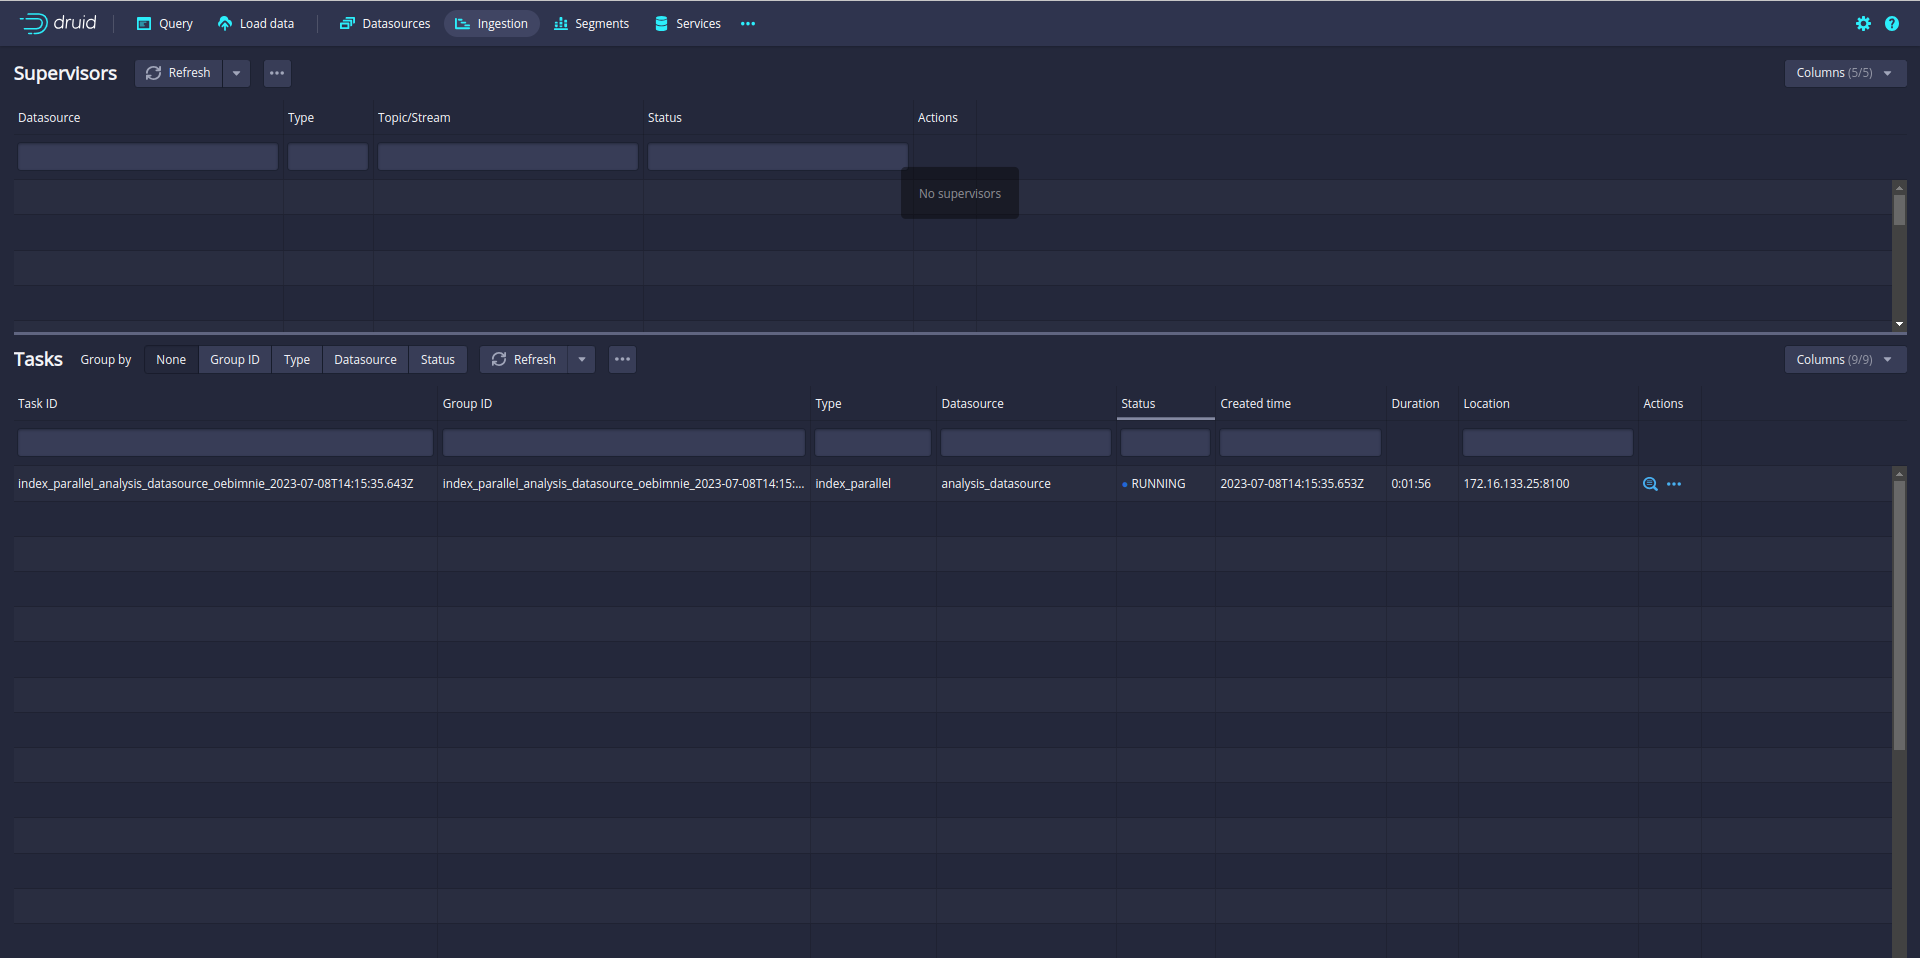
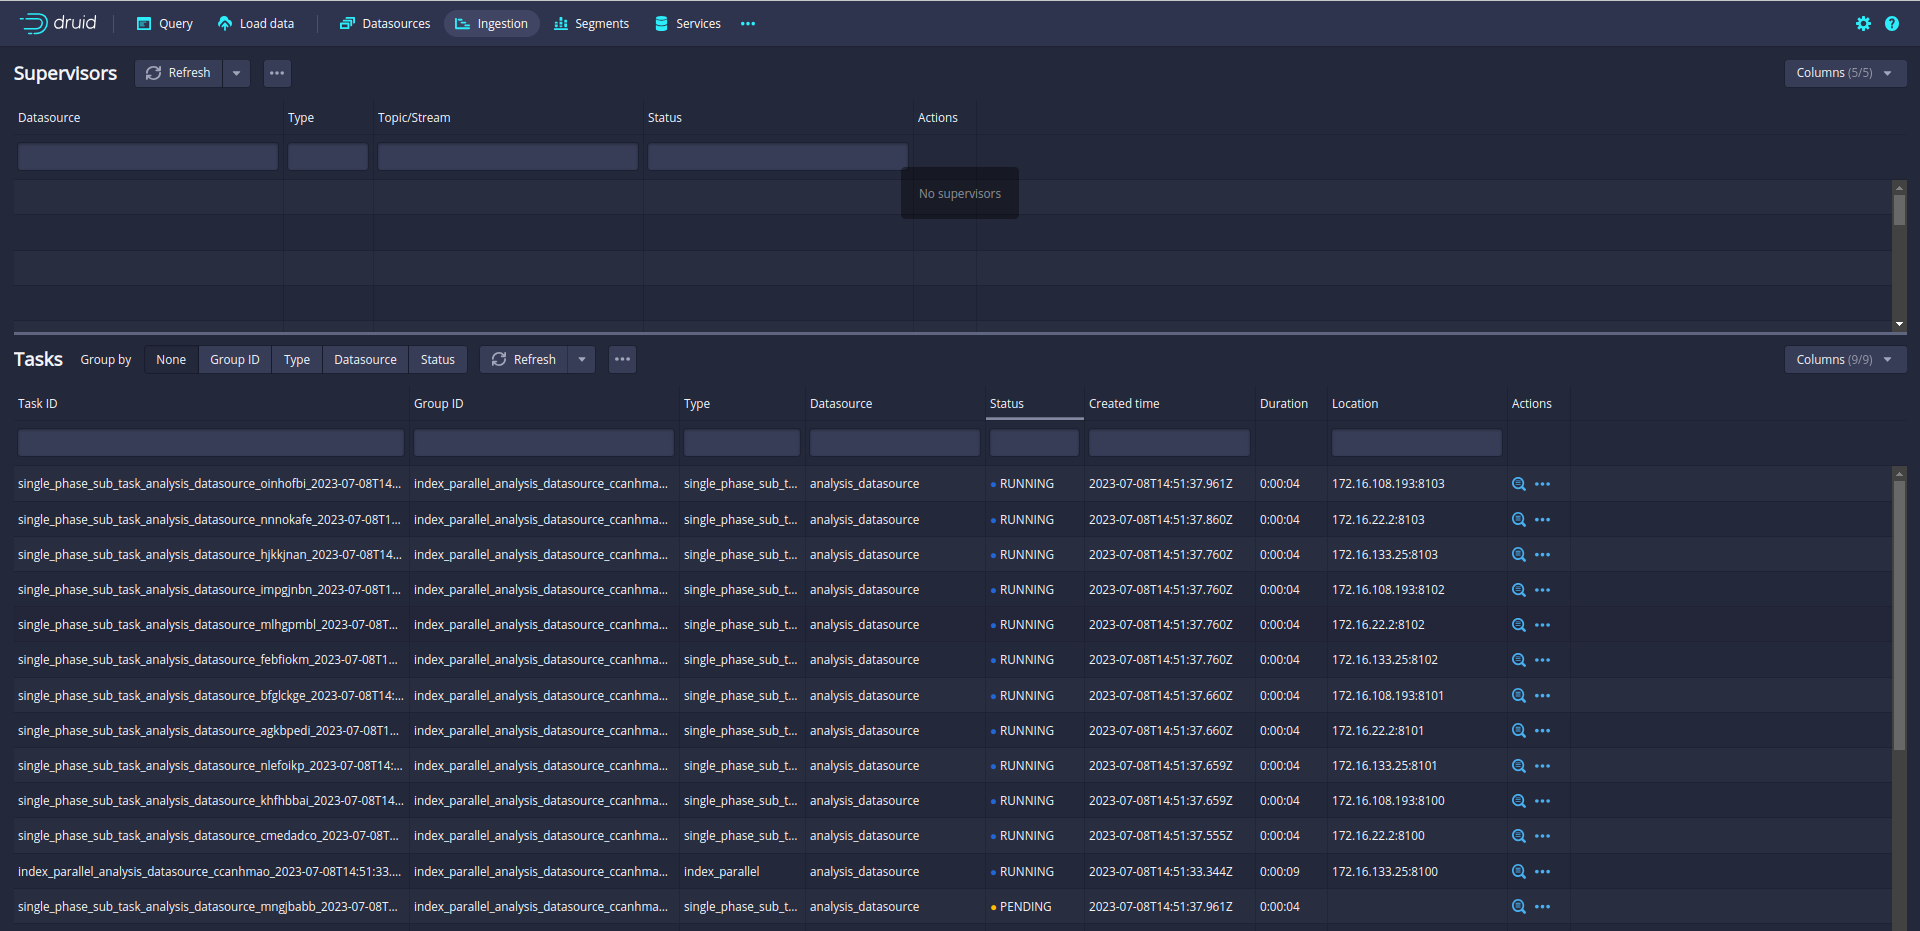
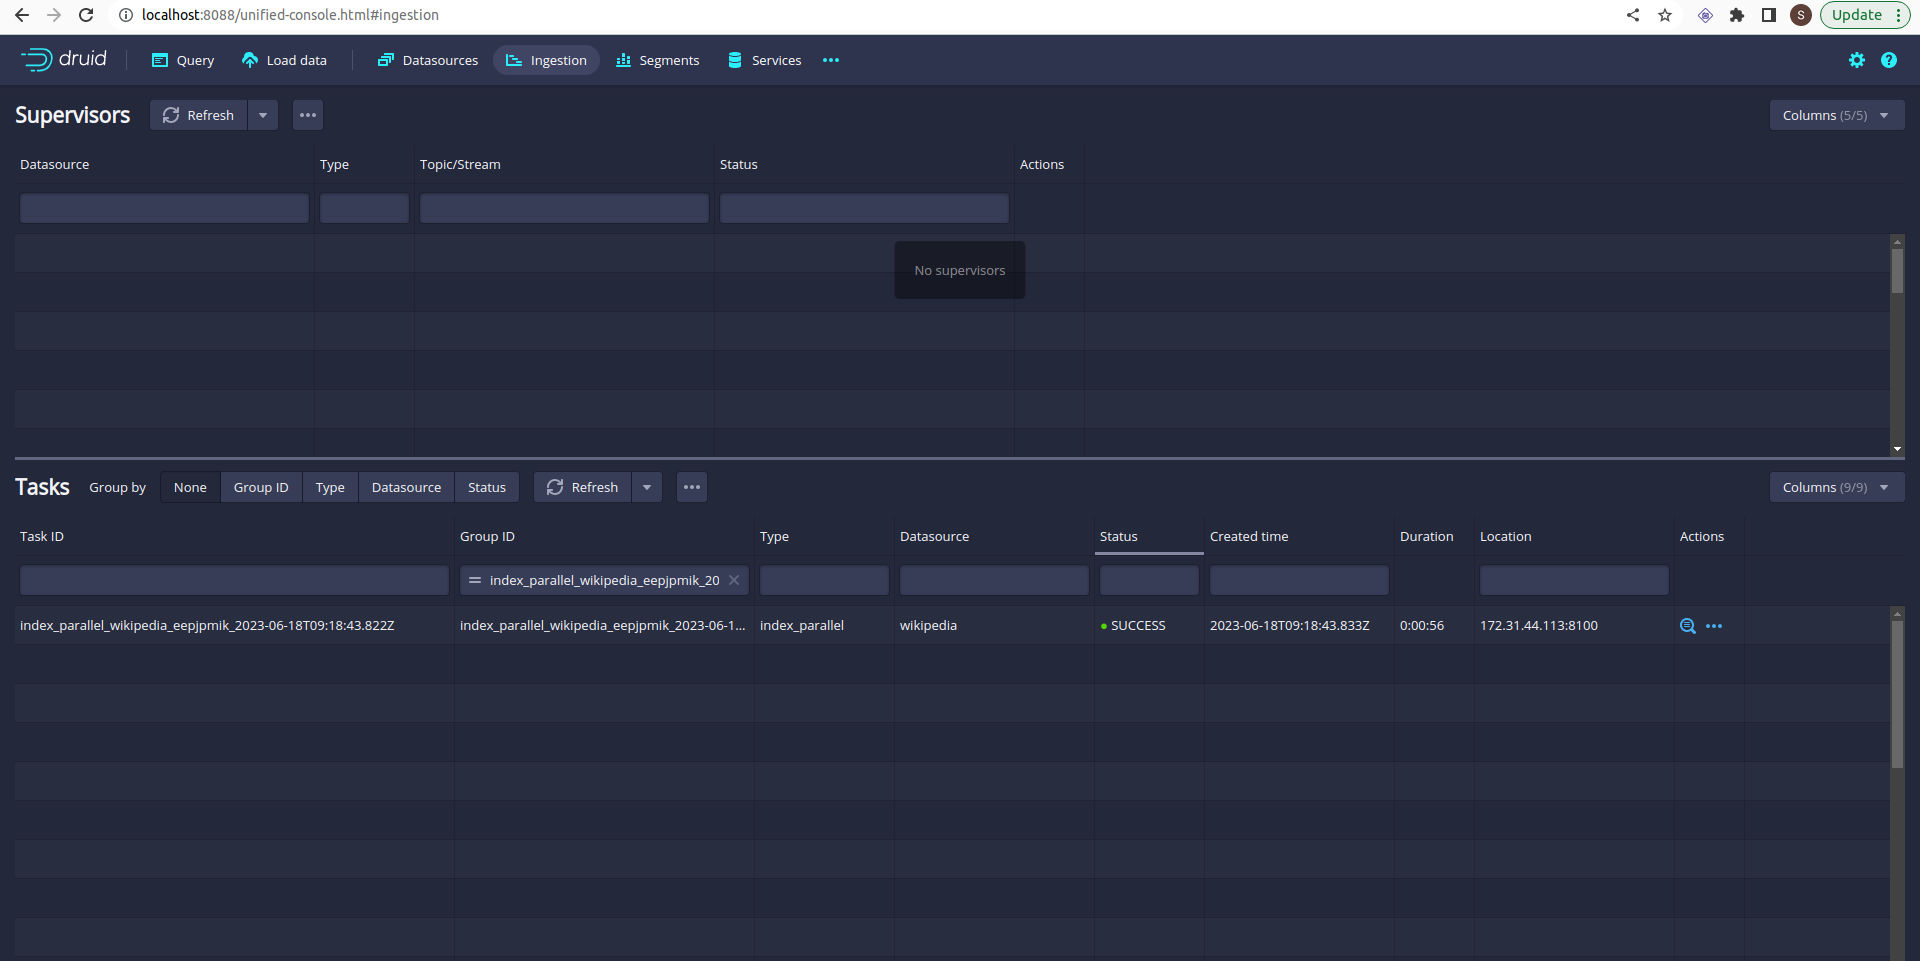
Ingestion is started. You can check the ingestion tab in the Druid UI:
So far so good. But you notice that only one task is running. A single task may take longer time if the data is big. Even your Druid cluster has more slots to run parallel task.
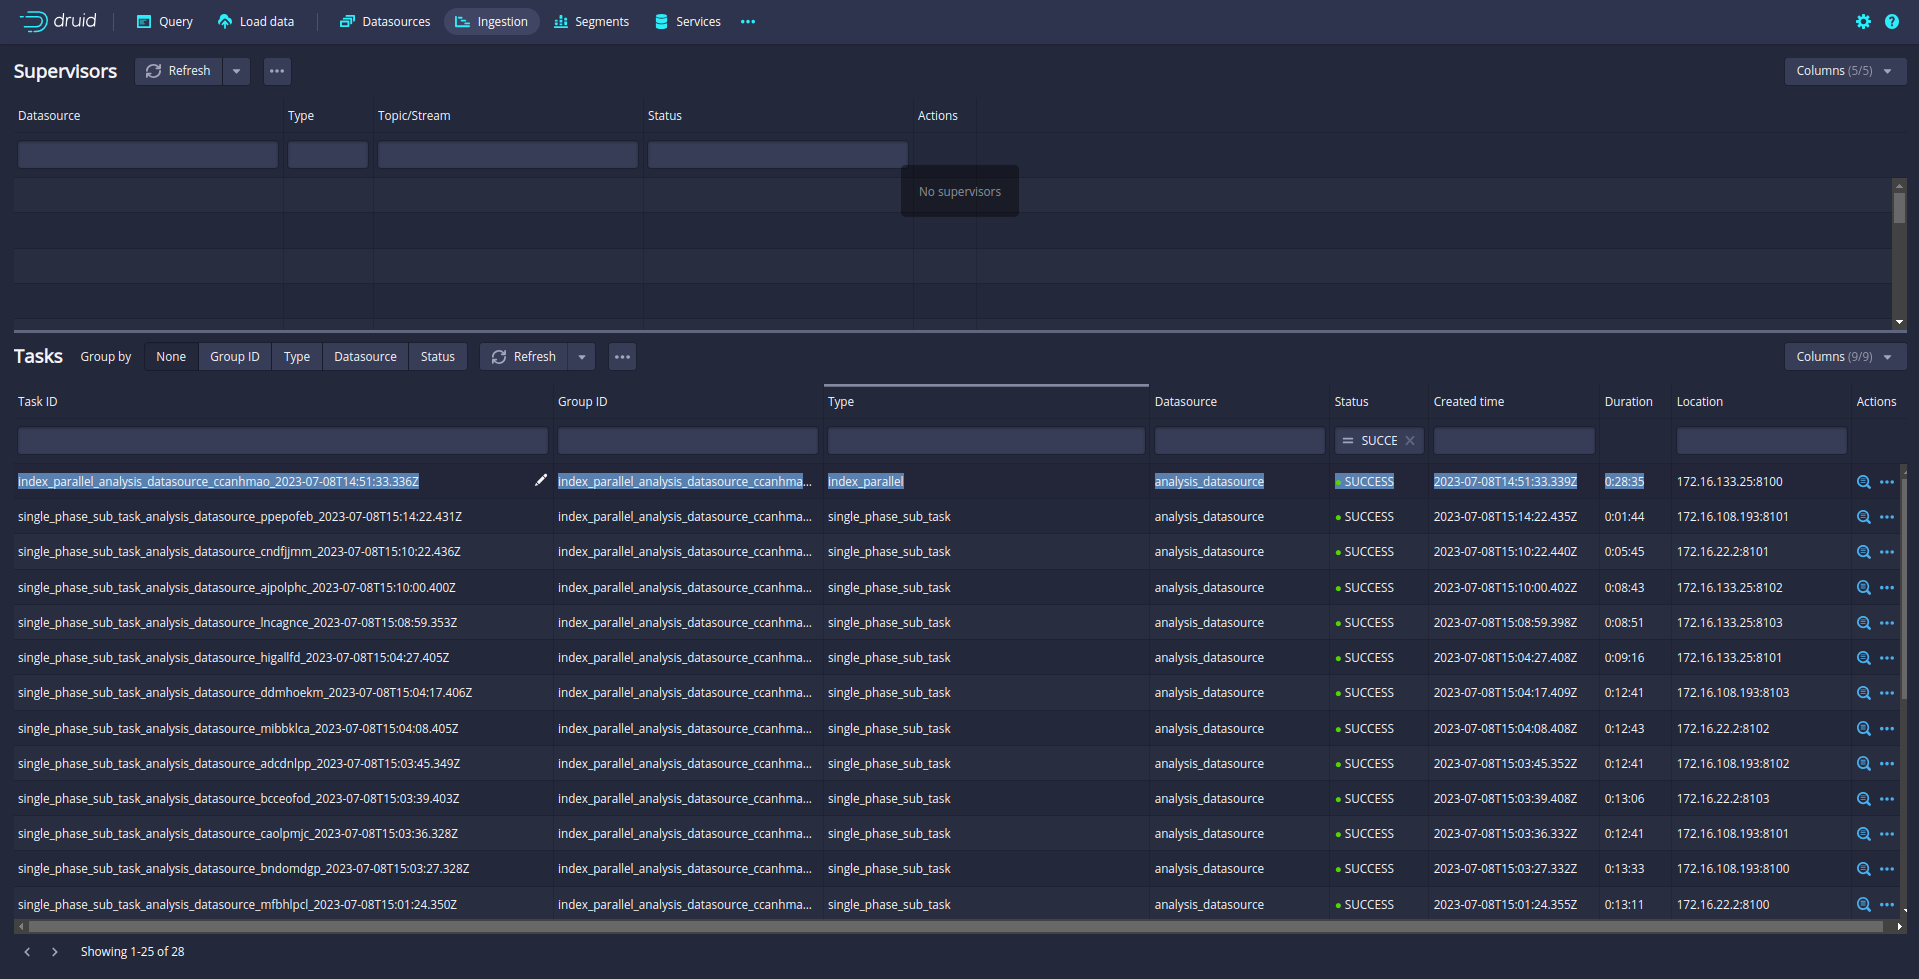
In my case, the Druid cluster has 12 slots. That means Druid can run 12 parallel tasks.
So let’s increase the parallelism from 1 to 12. (default parallelism is 1)
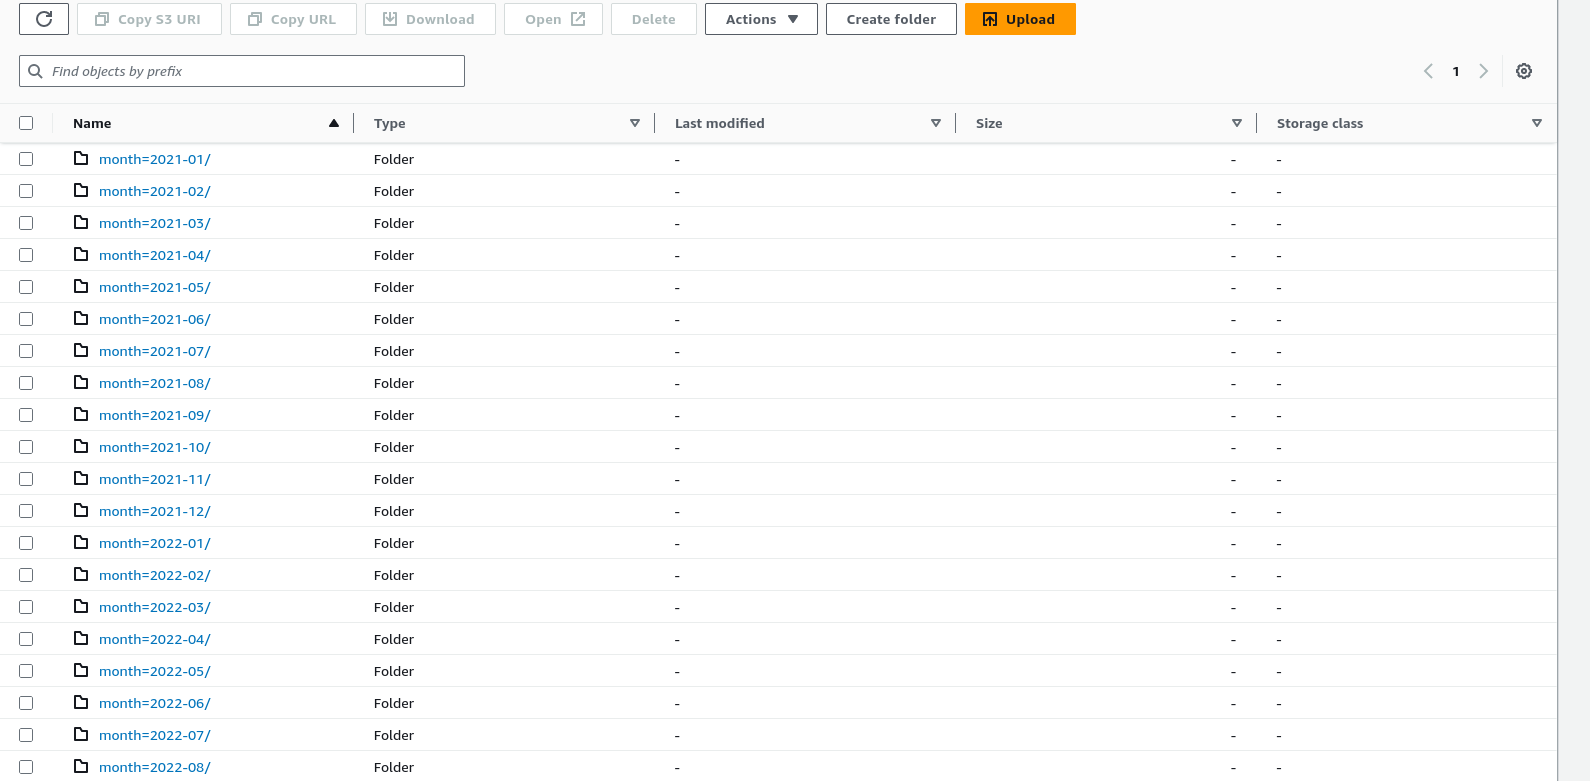
Before starting the ingestion, Make sure your data is partitioned or sorted on the S3 bucket like month, week, and day. In my case data is partitioned by month.
Let’s run again and check the ingestion Tab:
Now, 12 subtasks are running in parallel. Druid will split data loading into multiple subtasks and run the 12 subtasks in parallel.
In this blog, I will describe, how to enable the S3 magic committer on the Spark cluster(Running on AWS Elastic Kubernetes Service).
Prerequisites:
EKS Cluster on AWS
Spark cluster setup on EKS
First, I will describe the need of s3 magic committer. I will take my use case as an example. Reading data from Postgres tables(meta, data ), joining them, and writing on S3. Here is the code:
Meta table:
val metaTable = s"(select * from analysis_meta where id >= 1220572171319017472 and id < 1620572171319017473) as meta"

val metaDf =
        spark
          .read
          .format("jdbc")
          .option("numPartitions" , "2000")
          .option("lowerBound",  "1220572171319017472")
          .option("upperBound", "1620572171319017473")
          .option("partitionColumn", "id")
          .option("dbtable", metaTable)
          .option("driver" , "org.postgresql.Driver")
          .option("url", "jdbc:postgresql://AWS-RDS-URL.amazonaws.com/analysis_db?user=****&password=****")
          .load()
Spark requires these parameters to partition the data of the table:
numPartitions
lowerBound
upperBound
partitionColumn
These parameters are mandatory otherwise spark will read all the data into a single partition.
Data table:
val textTable = s"(select id , text from analysis_data where id >= 1220572171319017472 and id < 1620572171319017473) as data"

val textDf =
      spark
        .read
        .format("jdbc")
        .option("numPartitions", "2000")
        .option("lowerBound", "1220572171319017472")
        .option("upperBound", "1620572171319017473")
        .option("partitionColumn", "id")
        .option("dbtable", textTable)
        .option("driver", "org.postgresql.Driver")
        .option("url", "jdbc:postgresql://AWS-RDS-URL.amazonaws.com/analysis_db?user=****&password=****")
        .load()
Join the meta and data table then write on S3:
val df = metaDf.join(textDf, "id")

      df
        .write
        .partitionBy("lang", "month")  // partition by language and month
        .mode(SaveMode.Append)
        .parquet(s"s3a://bucket-name/analysis-data")
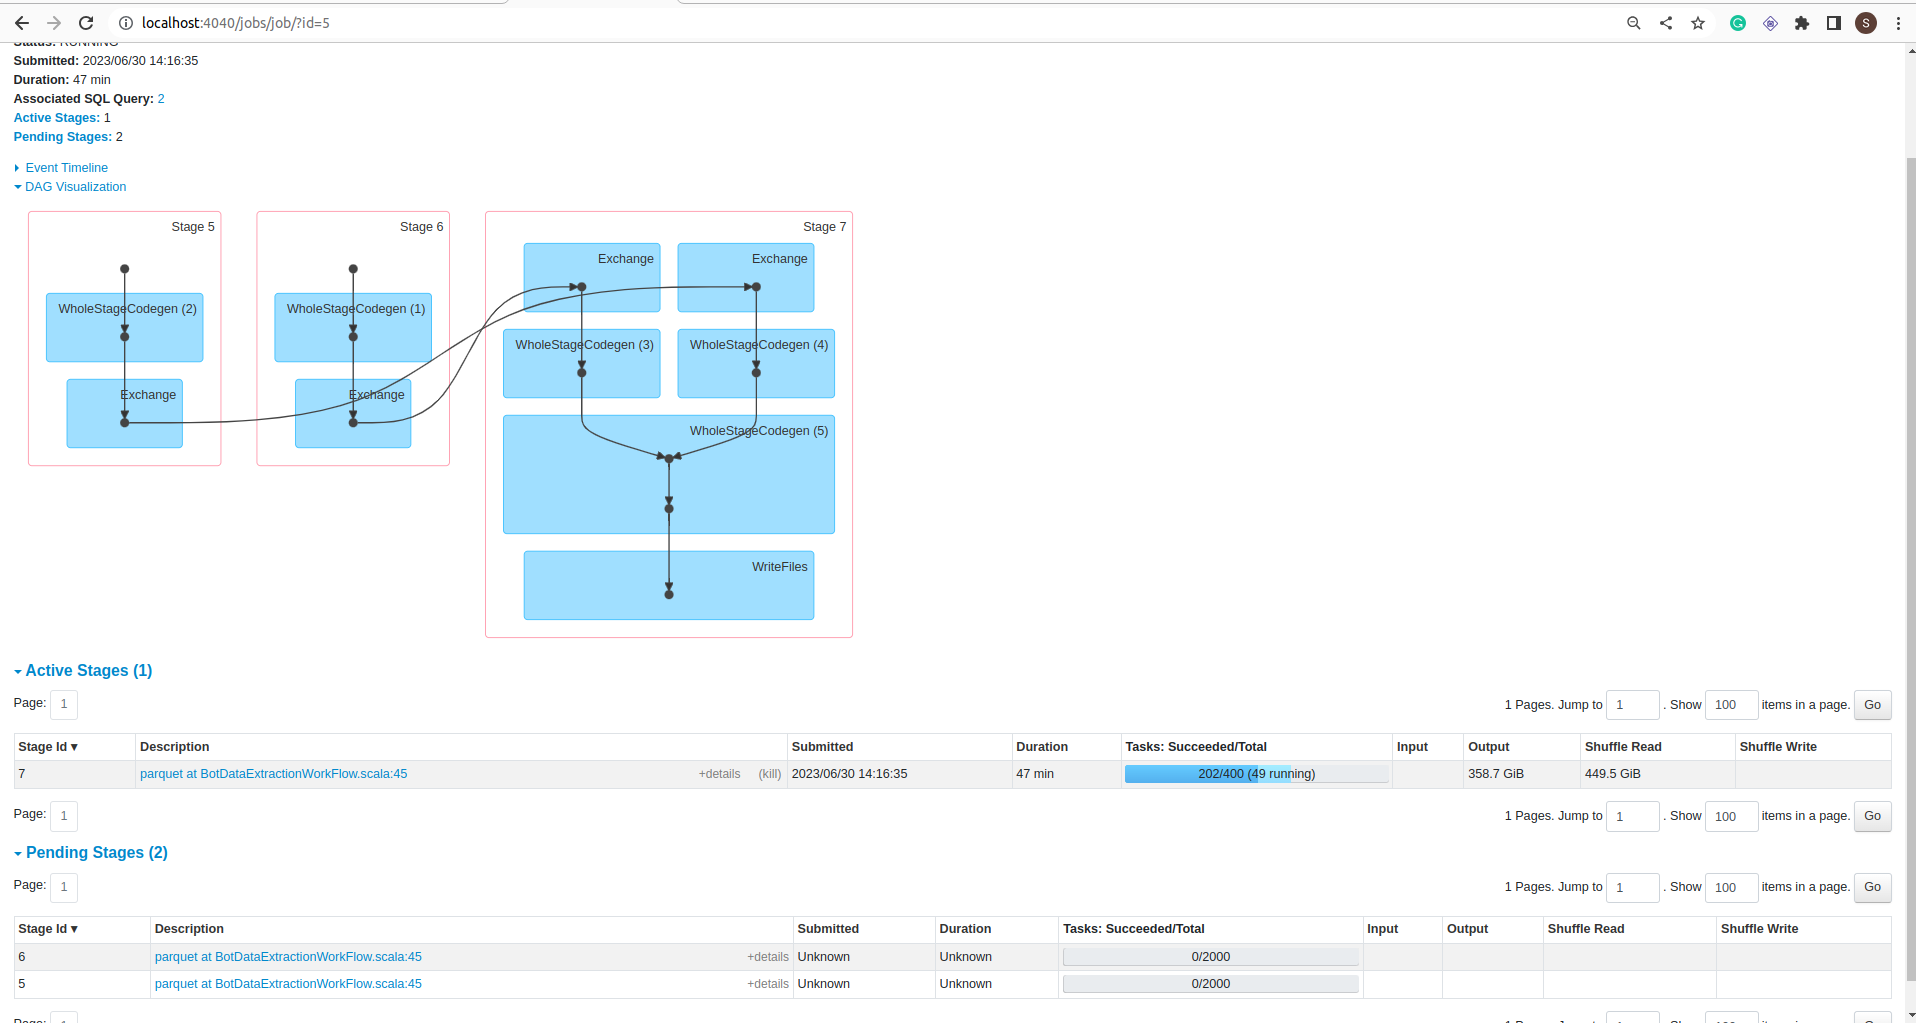
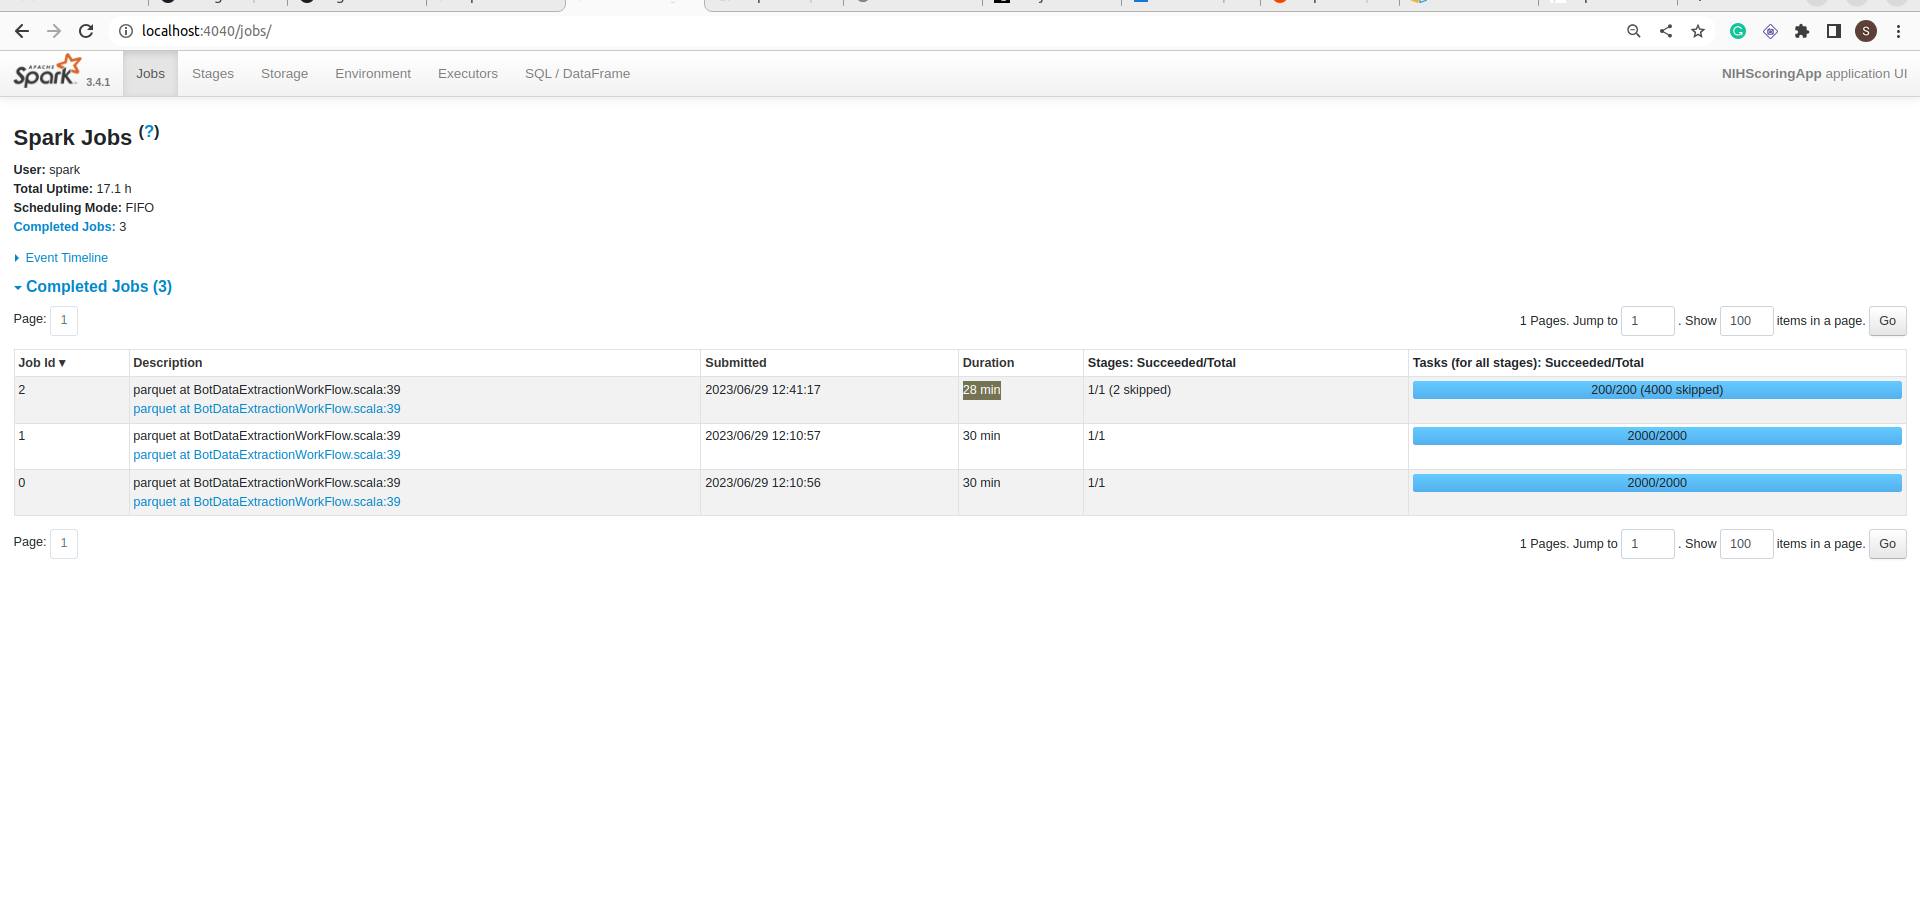
let’s run this job. Both tables have 80M rows(~ 400GB). It will take 1 hour to complete.
DAG:
Stage:
Job:
My Spark cluster size is 8 * m5.2xlarge nodes.
If you notice in the jobs details screenshot, the Job took 1 hour to complete but data is not committed into the folder. It is still in _temporary folder.
To commit all the data spark took more than 12 hours.
That was surprising but It is not a Spark problem. Spark is warning about that in the log:
11549:23/06/30 09:26:40 WARN AbstractS3ACommitterFactory: Using standard FileOutputCommitter to commit work. This is slow and potentially unsafe.
“Using standard FileOutputCommitter to commit work. This is slow and potentially unsafe.”
Let’s switch to the magic committer. It requires just a configuration change:
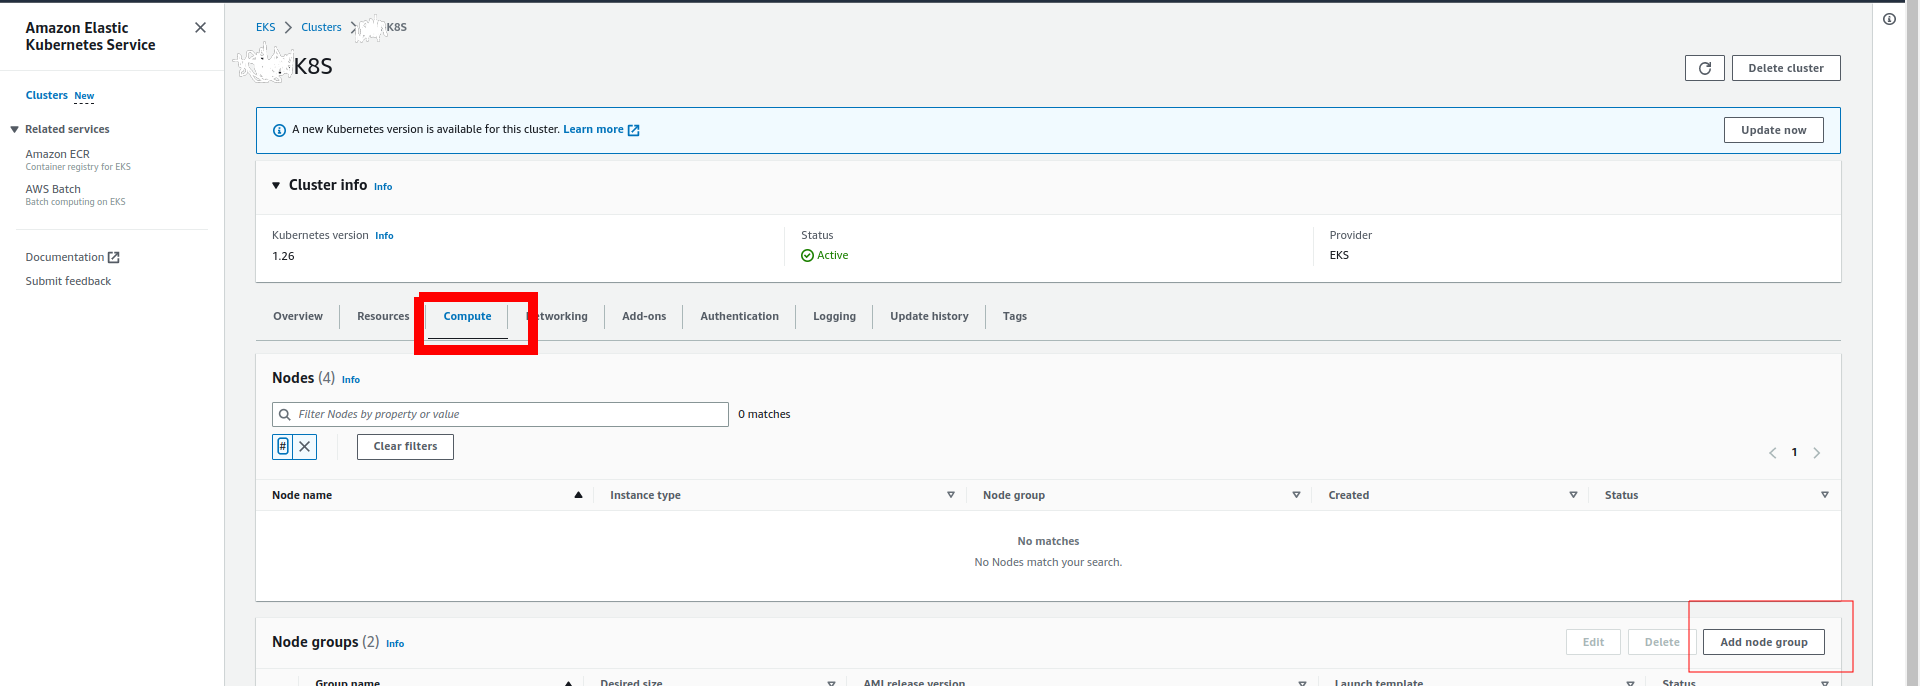
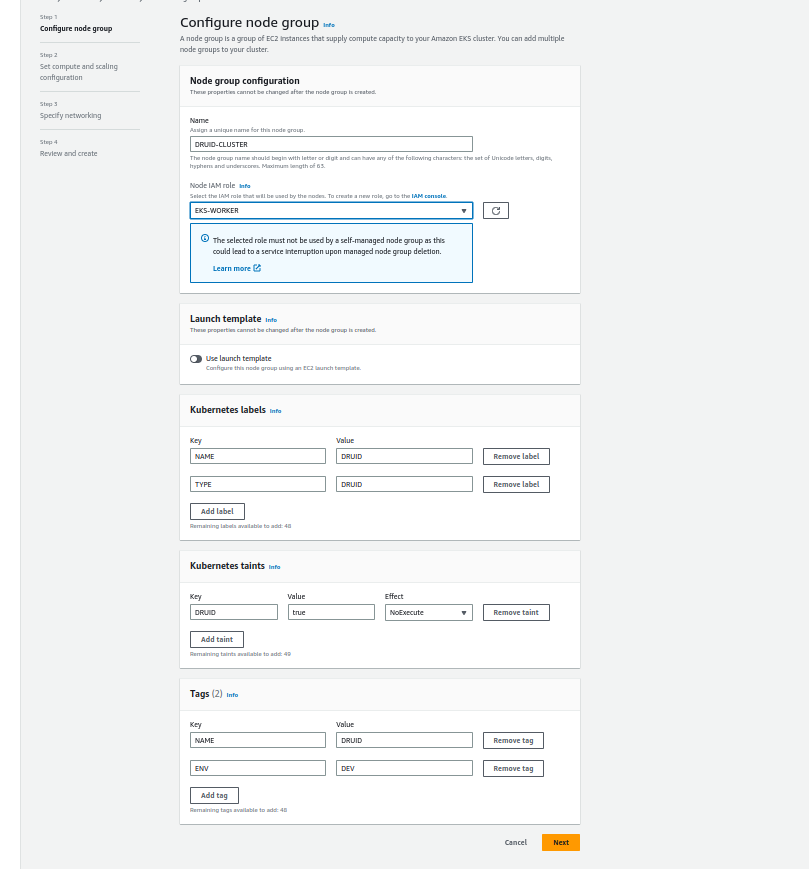
If you noticed, I used taints for resource isolation so no other pods can run the druid cluster node group.
Click on next and add the details of nodes (I am using 5 m5.large nodes and 256 GB disk):
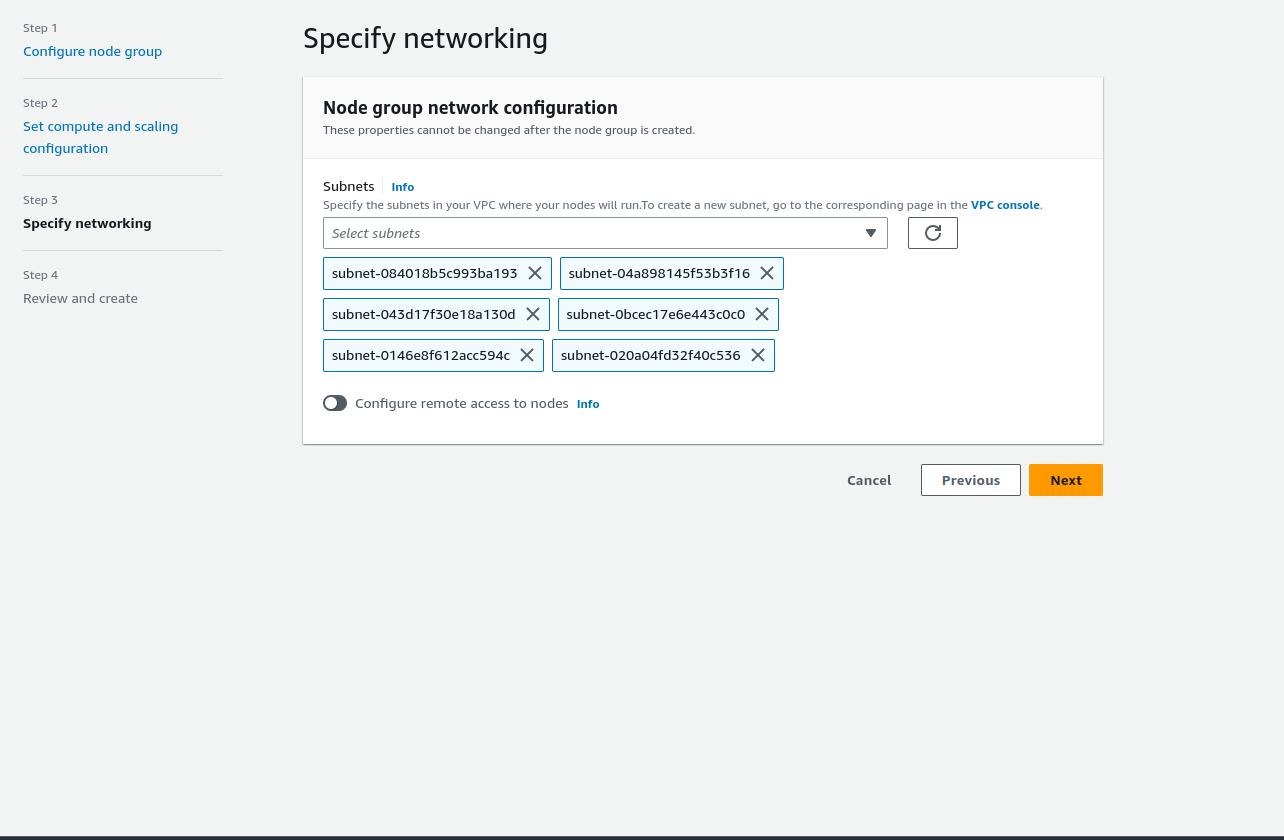
Click on Next and selects the subnets:
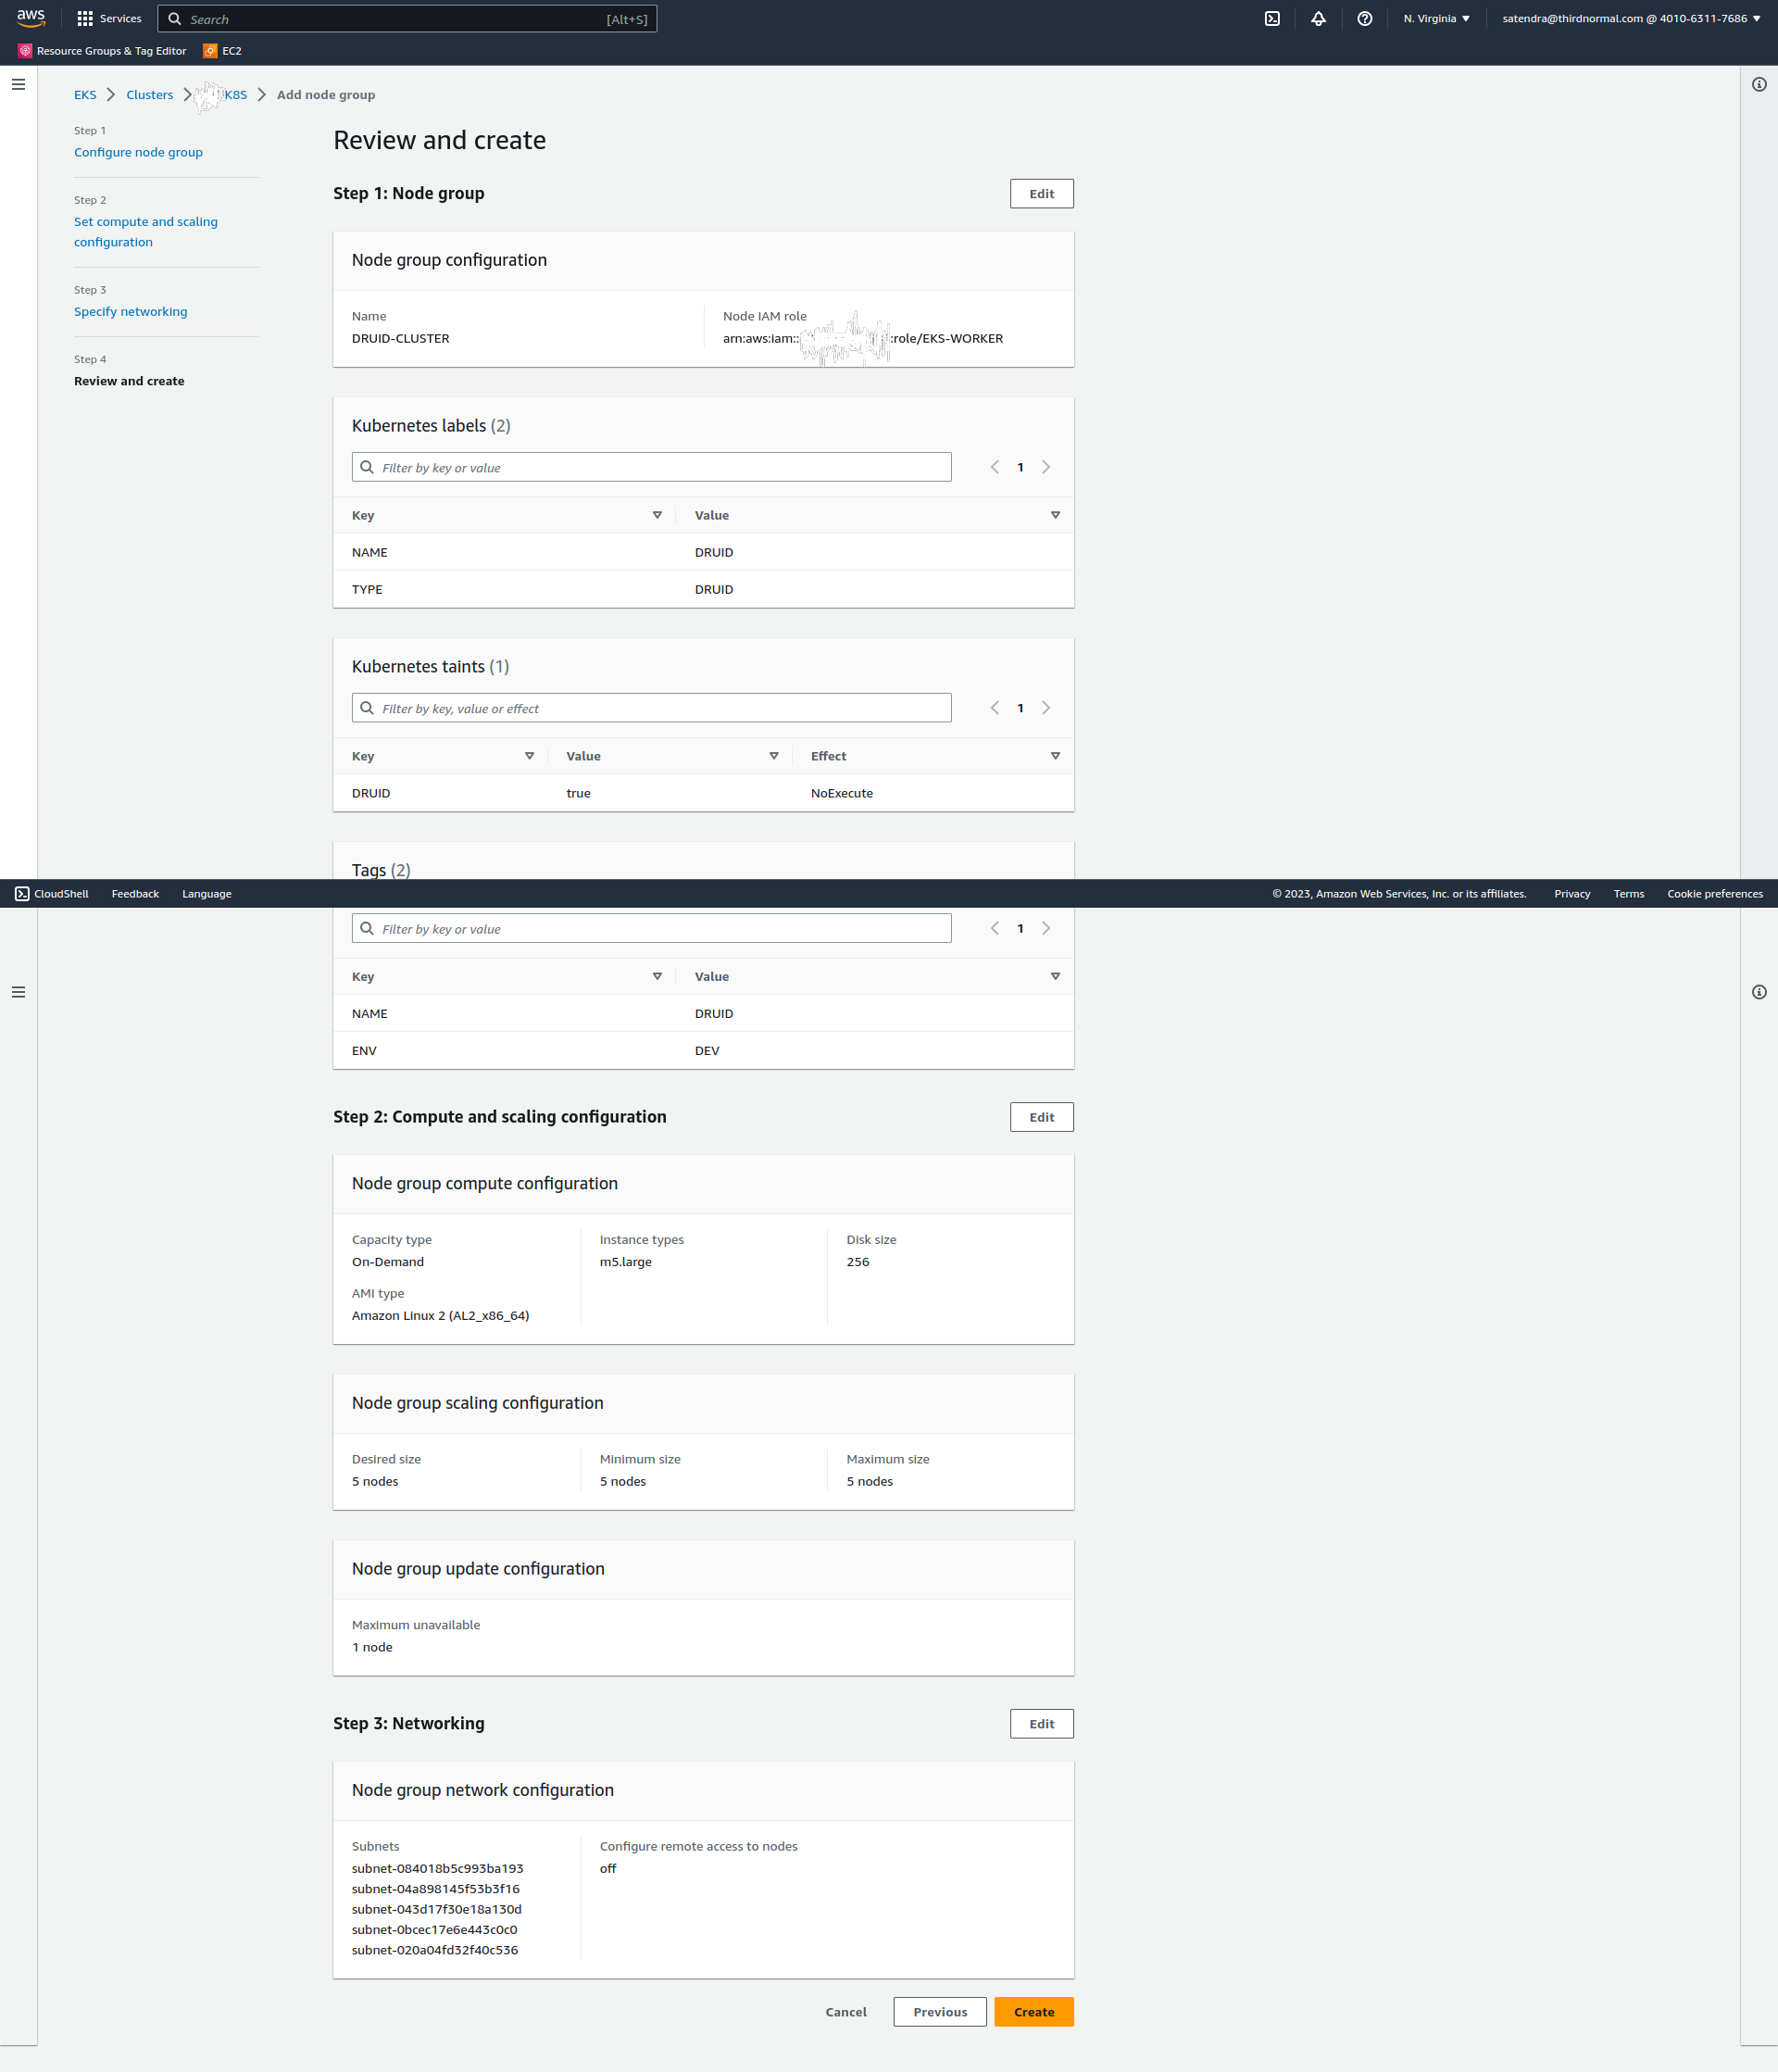
Click on next and review the details:
Click on Create.
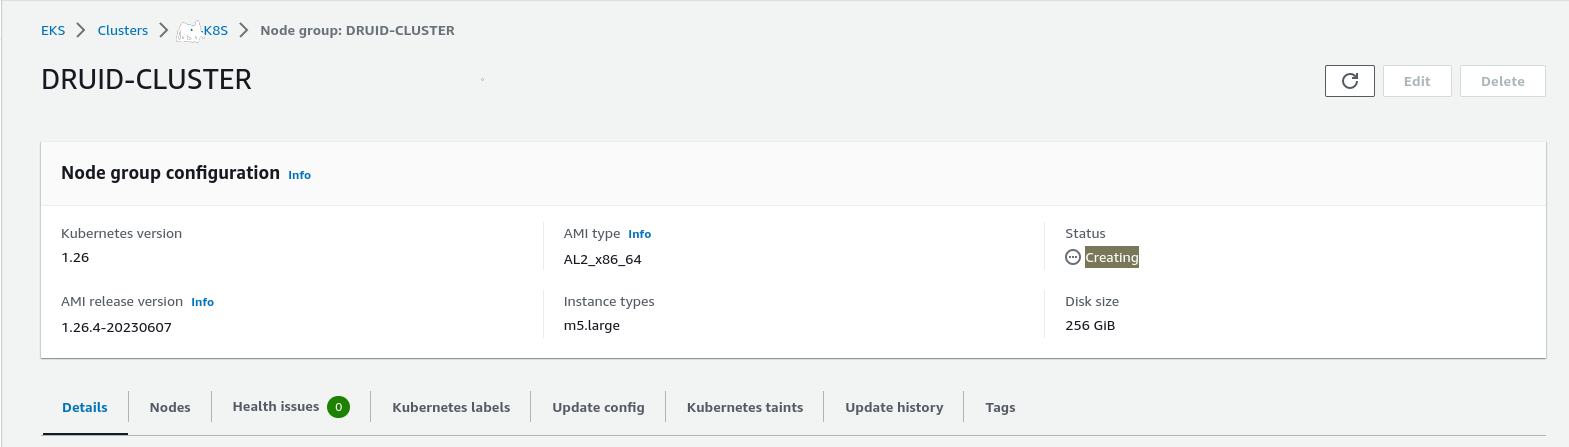
It will take a few seconds to create a node group:
Refresh the page:
The node group is ready.
Let’s validate the nodes:
$ kubectl get nodes -l TYPE=DRUID
NAME STATUS ROLES AGE VERSION
ip-172-31-16-51.ec2.internal Ready 22m v1.26.4-eks-0a21954
ip-172-31-3-242.ec2.internal Ready 22m v1.26.4-eks-0a21954
ip-172-31-35-102.ec2.internal Ready 22m v1.26.4-eks-0a21954
ip-172-31-67-191.ec2.internal Ready 22m v1.26.4-eks-0a21954
ip-172-31-90-74.ec2.internal Ready 22m v1.26.4-eks-0a21954
Create a namespace for the druid cluster:
$ kubect create namespace druid
namespace/druid created
Druid required the zookeeper cluster so first, we need to install the zookeeper cluster. I am using bitnami helm charts to create the zookeeper cluster:
$ helm install zookeeper  -n druid  -f zookeeper/values.yaml   oci://registry-1.docker.io/bitnamicharts/zookeeper
NAME: zookeeper
LAST DEPLOYED: Sun Jun 18 13:39:20 2023
NAMESPACE: druid
STATUS: deployed
REVISION: 1
TEST SUITE: None
NOTES:
CHART NAME: zookeeper
CHART VERSION: 11.4.2
APP VERSION: 3.8.1

** Please be patient while the chart is being deployed **

ZooKeeper can be accessed via port 2181 on the following DNS name from within your cluster:

    zookeeper.druid.svc.cluster.local

To connect to your ZooKeeper server run the following commands:

    export POD_NAME=$(kubectl get pods --namespace druid -l "app.kubernetes.io/name=zookeeper,app.kubernetes.io/instance=zookeeper,app.kubernetes.io/component=zookeeper" -o jsonpath="{.items[0].metadata.name}")
    kubectl exec -it $POD_NAME -- zkCli.sh

To connect to your ZooKeeper server from outside the cluster execute the following commands:

    kubectl port-forward --namespace druid svc/zookeeper 2181:2181 &
    zkCli.sh 127.0.0.1:2181
Let’s quickly check the zookeeper cluster:
$ kubectl get pods -n druid
NAME READY STATUS RESTARTS AGE
zookeeper-0 1/1 Running 0 4m32s
zookeeper-1 1/1 Running 0 4m32s
zookeeper-2 1/1 Running 0 4m32s
The zookeeper cluster is up and running.
Let’s start on Druid. I am using the Druid operator to install the Druid cluster.
First, install the druid operator using helm(clone the code from here to get the chart):
$ kubectl create namespace druid-operator
namespace/druid-operator created

$ helm -n druid-operator install cluster-druid-operator -f druid-operator/chart/values.yaml  ./druid-operator/chart
NAME: cluster-druid-operator
LAST DEPLOYED: Sun Jun 18 13:52:03 2023
NAMESPACE: druid-operator
STATUS: deployed
REVISION: 1
TEST SUITE: None
NOTES:
Refer to https://github.com/druid-io/druid-operator/blob/master/docs/README.md to get started.
let’s verify the operator pods;
$ kubectl get pods -n druid-operator
NAME READY STATUS RESTARTS AGE
cluster-druid-operator-d68649447-qjmlv 1/1 Running 0 90s
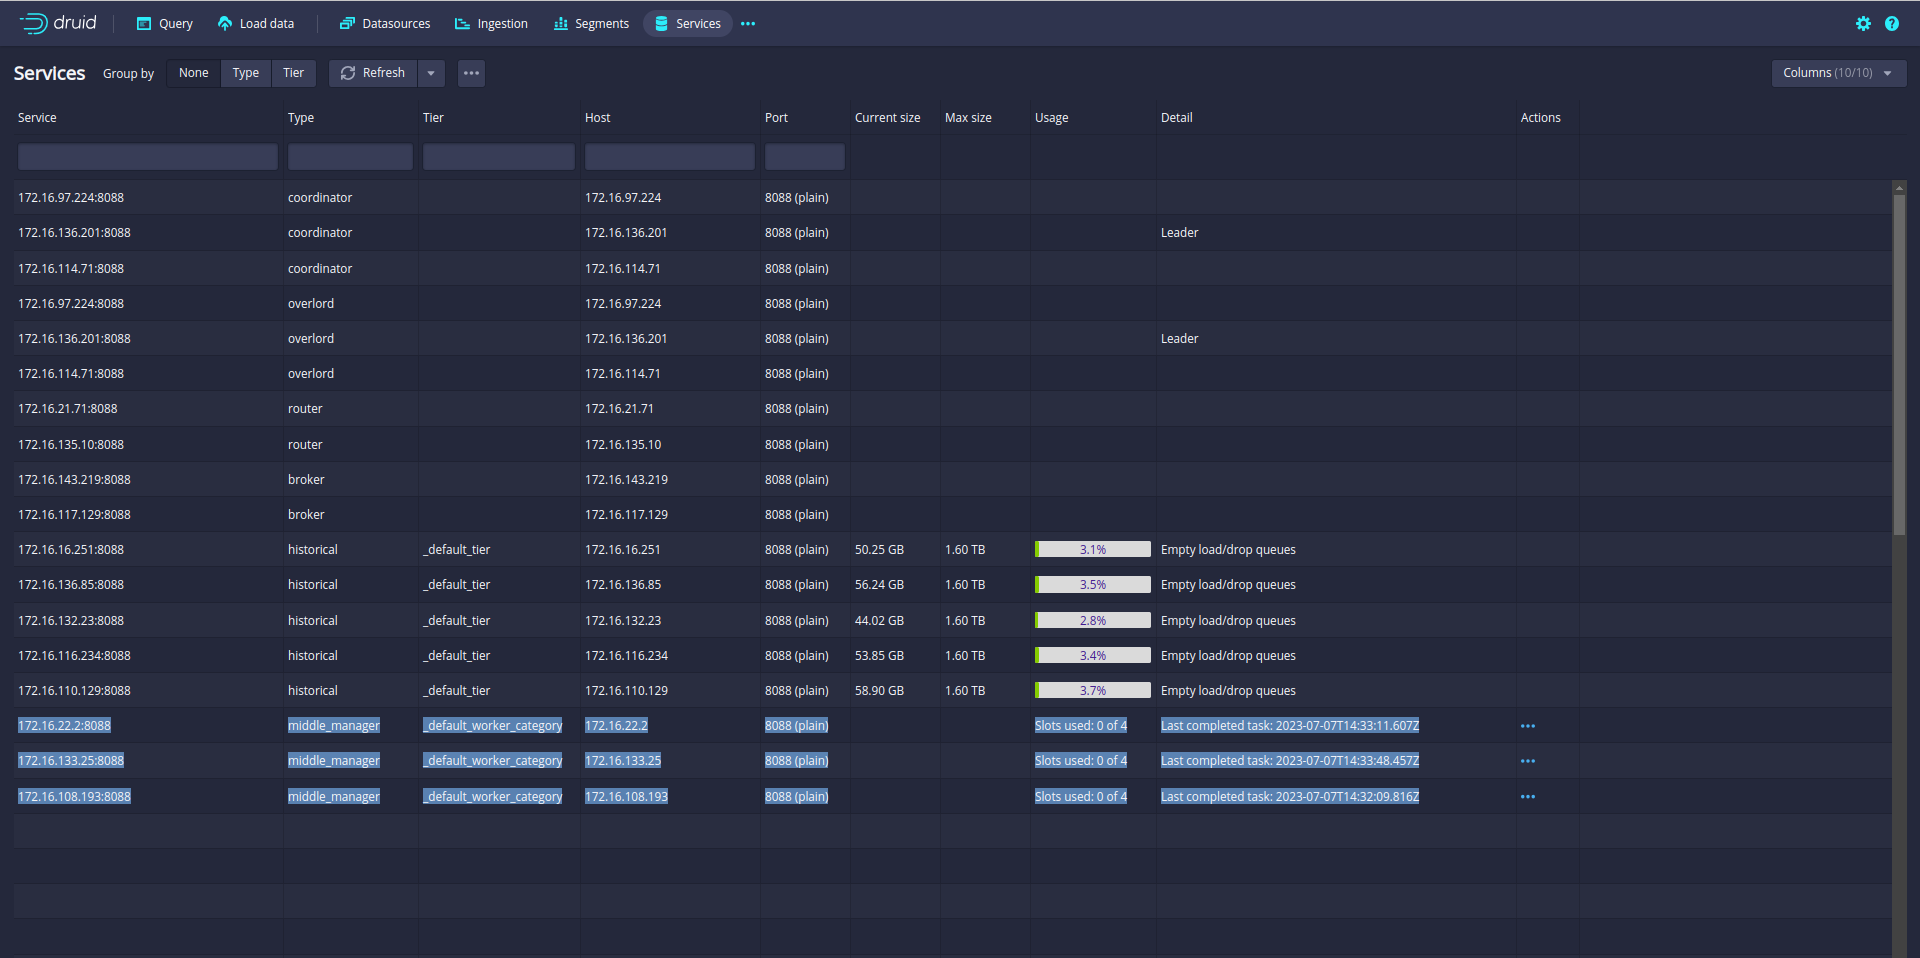
Druid services:
Druid has several types of services:
Coordinator service manages data availability on the cluster.
Overlord service controls the assignment of data ingestion workloads.
Broker handles queries from external clients.
Router services are optional; they route requests to Brokers, Coordinators, and Overlords.
Historical services store queryable data.
MiddleManager services ingest data.
For this deployment, I will deploy Coordinator and Overlord as one service. Here is the config to deploy Coordinator and Overlord as one service:
FoldLeft is the one of the my favourite function in Scala. In this blog, I will explain capabilities of foldLeft. After reading this blog foldLeft will be your favourite function if you like Scala. In this blog I am taking example of List’s foldLeft. Of course, It’s also available on many Scala collection like Vector, Set, Map,Option.
Let’s see foldLeft definition from Scala doc:
According definition, foldLeft can do everything which required iteration of all elements of list. Really ?
Splitting into two list not big deal 🙂 My use case is different. I have 4 predicate. That means split input list into four list according predicates. First list satisfy first predicate and second list satisfy second predicate ..so on. discard otherwise.
 def span(list: List[Int], p1: Int => Boolean, p2: Int => Boolean, p3: Int => Boolean, p4: Int => Boolean): (List[Int], List[Int], List[Int], List[Int]) =
 list.foldLeft[(List[Int], List[Int], List[Int], List[Int])]((Nil, Nil, Nil, Nil)) { case ((p1List, p2List, p3List, p4List), element) =>
 (
 if (p1(element)) p1List :+ element else p1List,
 if (p2(element)) p2List :+ element else p2List,
 if (p3(element)) p3List :+ element else p3List,
 if (p4(element)) p4List :+ element else p4List
 )
 }